运用springboot搭建并部署web项目的示例
前言
一直以来都是用springmvc+mybatis进行后端接口开发工作,最近闲来无事,根据现有功能需求,用springboot+mybatis部署一套简单的web项目。
所用工具
- IntelliJ IDEA 2018.1.4
- JDK 1.8
- apache-tomcat-8.0.50
所解决的问题
1、如何用idea创建springboot项目
2、如何进行 服务器、数据库、mybatis、视图解析器的配置
3、如何使用mybatis generator 自动生成代码
4、如何使用multipart进行文件上传
5、如何运用springboot的事务
6、如何打包进行tomcat部署
运用idea创建springboot项目
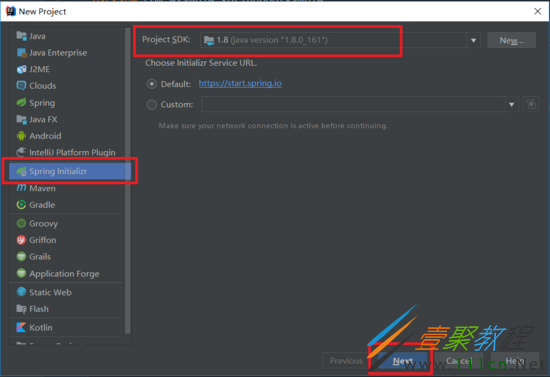
1、打开IDEA,File -> New -> Project,选择Spring Initializr,然后next。
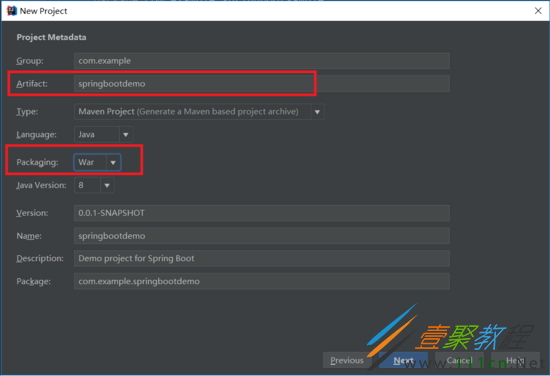
2、修改Ariifact,下面的Name、package会自动修改;Packaging有两种模式,一种是Jar,一种是War;因为springboot中自带了tomcat,因此可以将项目打成jar,直接运行;而我现有项目是部署到tomcat上,因此我需要打成war包;然后next。
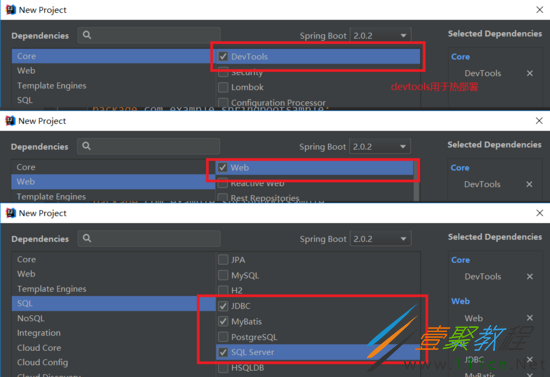
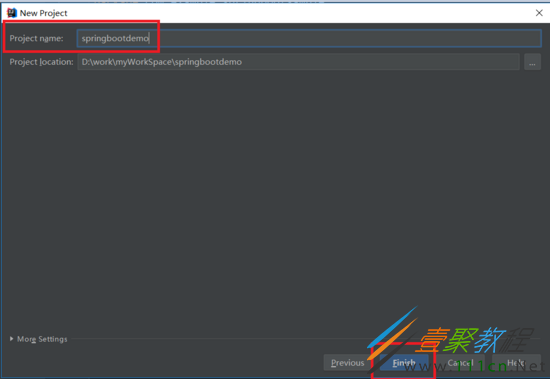
3、设置项目依赖,然后next ,进入下一页 ,设置project name,点击finish完成。
4、进入项目
pom.xml
  4.0.0

  com.example
  springbootdemo
  0.0.1-SNAPSHOT
  war

  springbootdemo
  Demo project for Spring Boot


    org.springframework.boot
    spring-boot-starter-parent
    2.0.2.RELEASE


    UTF-8
    UTF-8
    1.8


      org.springframework.boot
      spring-boot-starter-jdbc


      org.springframework.boot
      spring-boot-starter-web


      org.mybatis.spring.boot
      mybatis-spring-boot-starter
      1.3.2


      org.springframework.boot
      spring-boot-devtools
      runtime


      com.microsoft.sqlserver
      mssql-jdbc
      runtime


      org.springframework.boot
      spring-boot-starter-tomcat
      provided


      org.springframework.boot
      spring-boot-starter-test
      test


        org.springframework.boot
        spring-boot-maven-plugin
无配置文件的springmvc
通过两个例子:1、http请求访问并渲染页面 2、http请求返回json字符串
-配置数据源、视图渲染
-添加视图渲染pom依赖
-创建WelcomeController、welcome.jsp
新增之后的项目结构
application.yml 配置数据源 和 视图渲染
# 数据源、视图配置
spring:
 datasource:
   url: jdbc:sqlserver://xx:1433;DatabaseName=xx
   username: xx
   password: xx
   driver-class-name: com.microsoft.sqlserver.jdbc.SQLServerDriver
 mvc:
  view:
   prefix: /WEB-INF/views/
   suffix: .jsp
pom.xml新增视图渲染依赖
      org.apache.tomcat.embed
      tomcat-embed-jasper
      provided


      javax.servlet
      jstl
创建WelcomeController
package com.example.springbootdemo.web;

import com.example.springbootdemo.entity.Welcome;
import com.example.springbootdemo.response.Response;
import com.example.springbootdemo.response.ResponseCode;
import org.springframework.stereotype.Controller;
import org.springframework.web.bind.annotation.RequestMapping;
import org.springframework.web.bind.annotation.ResponseBody;
import org.springframework.web.servlet.ModelAndView;
import java.util.ArrayList;
import java.util.List;

@Controller
@RequestMapping("/welcome")
public class WelcomeController {
  /**
   * 访问welcome.jsp页面
   * @return
   */
  @RequestMapping("welcomeIndex")
  public ModelAndView welcomeIndex(){
    ModelAndView mv = new ModelAndView();
    mv.setViewName("welcome");
    mv.addObject("name","xx");
    return mv;
  }

  /**
   * 返回json字符串
   * @return
   */
  @RequestMapping("getWelcomeInfo")
  @ResponseBody
  public Response getWelcomeInfo(){
    /**
     * 测试数据
     */
    List welcomes = new ArrayList();
    Welcome w1 = new Welcome();
    w1.setId("1");
    w1.setName("xx1");
    w1.setAge(11);
    w1.setGender("女");

    Welcome w2 = new Welcome();
    w2.setId("2");
    w2.setName("xx2");
    w2.setAge(22);
    w2.setGender("男");
    welcomes.add(w1);
    welcomes.add(w2);

    Response response = new Response();
    response.setData(welcomes);
    response.setRetcode(ResponseCode.SUCCESS);
    response.setRetdesc("Success");
    return response;
  }
}
创建welcome.jsp
  视图渲染


  您好,${name}
启动项目,并访问
http://**loc*alhost:8080/welcome/getWelcomeInfo
http://lo*calhos*t*:8080/welcome/welcomeIndex
使用mybatis generator自动生成代码
用于为表创建 *Mapper.xml、model、dao文件
在pom.xml 添加mybatis generator 自动生成代码插件
        org.springframework.boot
        spring-boot-maven-plugin


        org.mybatis.generator
        mybatis-generator-maven-plugin
        1.3.2

          ${basedir}/src/main/resources/generator/generatorConfig.xml
          true
          true
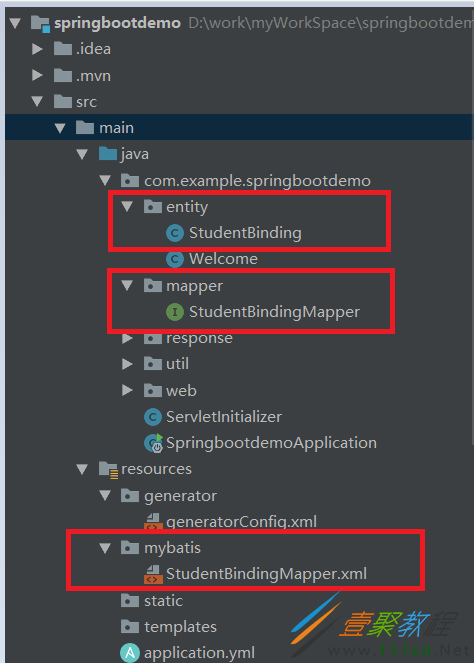
在上面pom.xml配置的pugin路径resources/generator 文件夹下添加generatorConfig.xml
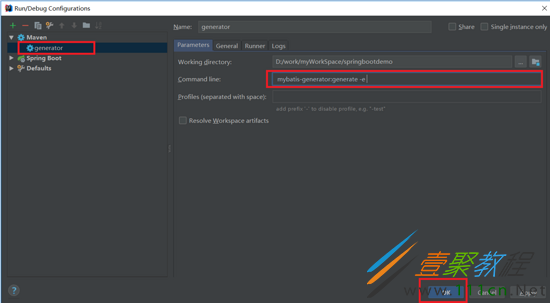
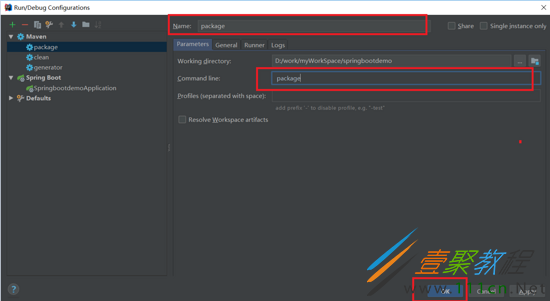
使用maven中的mybatis-generator:generate根据数据库里面表生产相关的类
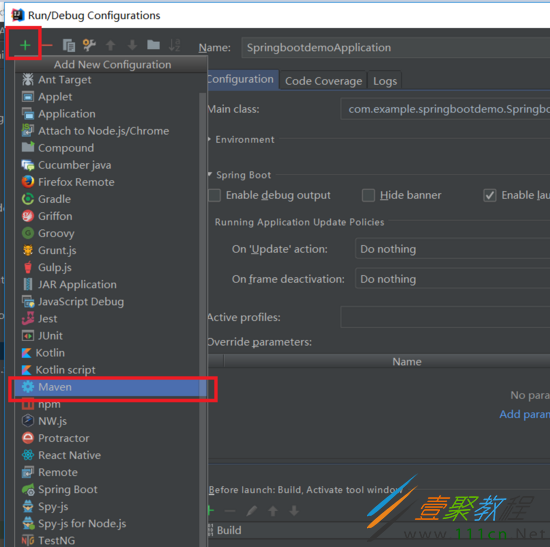
Edit Configurations -> 添加 -> Maven
配置mybatis
在application.yml 中添加mybatis的配置
# mybatis配置
mybatis:
 mapper-locations: classpath*:mybatis/*Mapper.xml
 type-aliases-package: com.example.springbootdemo.entity
在StudentBindingMapper.java中添加 @Repository("studentBindingMapper")注解才能使用@MapperScan扫描到
@Repository("studentBindingMapper")
public interface StudentBindingMapper {}
在SpringbootdemoApplication.java添加@MapperScan
package com.example.springbootdemo;
import org.mybatis.spring.annotation.MapperScan;
import org.springframework.boot.SpringApplication;
import org.springframework.boot.autoconfigure.SpringBootApplication;

@SpringBootApplication
@MapperScan("com.example.springbootdemo.mapper")
public class SpringbootdemoApplication {

  public static void main(String[] args) {
    SpringApplication.run(SpringbootdemoApplication.class, args);
  }
}
添加service、controller层
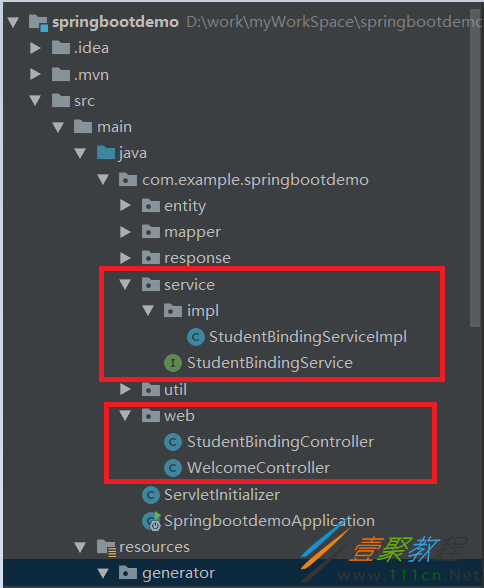
项目层级
添加StudentBindingService
package com.example.springbootdemo.service;
import com.example.springbootdemo.entity.StudentBinding;
import java.util.List;

public interface StudentBindingService {
  int deleteByPrimaryKey(Long id);
  int insert(StudentBinding record);
  int insertSelective(StudentBinding record);
  StudentBinding selectByPrimaryKey(Long id);
  int updateByPrimaryKeySelective(StudentBinding record);
  int updateByPrimaryKey(StudentBinding record);
  void validTransaction(Long id);
  List getStudentBindByQuery(StudentBinding record);
}
添加StudentBindingServiceImpl
package com.example.springbootdemo.service.impl;

import com.example.springbootdemo.entity.StudentBinding;
import com.example.springbootdemo.mapper.StudentBindingMapper;
import com.example.springbootdemo.service.StudentBindingService;
import org.springframework.beans.factory.annotation.Autowired;
import org.springframework.stereotype.Service;
import org.springframework.transaction.annotation.Transactional;
import java.util.List;

@Service(value = "studentBindingService")
public class StudentBindingServiceImpl implements StudentBindingService {
  @Autowired
  private StudentBindingMapper studentBindingMapper;

  @Override
  public int deleteByPrimaryKey(Long id) {
    return studentBindingMapper.deleteByPrimaryKey(id);
  }

  @Override
  public int insert(StudentBinding record) {
    return studentBindingMapper.insert(record);
  }

  @Override
  public int insertSelective(StudentBinding record) {
    return studentBindingMapper.insertSelective(record);
  }

  @Override
  public StudentBinding selectByPrimaryKey(Long id) {
    return studentBindingMapper.selectByPrimaryKey(id);
  }

  @Override
  public int updateByPrimaryKeySelective(StudentBinding record) {
    return studentBindingMapper.updateByPrimaryKeySelective(record);
  }

  @Override
  public int updateByPrimaryKey(StudentBinding record) {
    return studentBindingMapper.updateByPrimaryKey(record);
  }

  @Override
  @Transactional
  public void validTransaction(Long id){
    // 删除之后,插入该id的数据
    studentBindingMapper.deleteByPrimaryKey(id);

    StudentBinding record = new StudentBinding();
    record.setId(id);
    studentBindingMapper.insertSelective(record);
  }

  @Override
  public List getStudentBindByQuery(StudentBinding record) {
    return studentBindingMapper.getStudentBindByQuery(record);
  }
}
新增StudentBindingController
package com.example.springbootdemo.web;

import com.example.springbootdemo.entity.StudentBinding;
import com.example.springbootdemo.response.Response;
import com.example.springbootdemo.response.ResponseCode;
import com.example.springbootdemo.service.StudentBindingService;
import org.springframework.beans.factory.annotation.Autowired;
import org.springframework.stereotype.Controller;
import org.springframework.web.bind.annotation.RequestMapping;
import org.springframework.web.bind.annotation.RequestParam;
import org.springframework.web.bind.annotation.ResponseBody;
import org.springframework.web.multipart.MultipartFile;
import org.springframework.web.servlet.ModelAndView;
import java.io.File;
import java.io.IOException;
import java.util.List;

@Controller
@RequestMapping(value = "/studentBind")
public class StudentBindingController {
  @Autowired
  private StudentBindingService studentBindingService;

  /**
   * 根据请求参数,删除绑定学生信息
   * @param id
   * @return
   */
  @RequestMapping("deleteByPrimaryKey")
  @ResponseBody
  public Response deleteByPrimaryKey(Long id){
    Response response = new Response();
    if(id==null){
      response.setRetcode(ResponseCode.PARAMARTER_ERROR);
      response.setRetdesc("参数错误");
      return response;
    }

    try{
      studentBindingService.deleteByPrimaryKey(id);
      response.setRetcode(ResponseCode.SUCCESS);
      response.setRetdesc("删除成功");
    }catch (Exception e){
      e.printStackTrace();
      response.setRetcode(ResponseCode.FAILED);
      response.setRetdesc("删除异常");
    }
    return response;
  }

  /**
   * 根据请求参数,添加绑定学生信息
   * @param record
   * @return
   */
  @RequestMapping("insertSelective")
  @ResponseBody
  public Response insertSelective(StudentBinding record){
    Response response = new Response();
    if(record==null){
      response.setRetcode(ResponseCode.PARAMARTER_ERROR);
      response.setRetdesc("参数错误");
      return response;
    }

    try{
      studentBindingService.insertSelective(record);
      response.setRetcode(ResponseCode.SUCCESS);
      response.setRetdesc("添加成功");
    }catch (Exception e){
      e.printStackTrace();
      response.setRetcode(ResponseCode.FAILED);
      response.setRetdesc("添加异常");
    }
    return response;
  }

  /**
   * 根据请求参数,查询绑定学生信息
   * @param id
   * @return
   */
  @RequestMapping("selectByPrimaryKey")
  @ResponseBody
  public Response selectByPrimaryKey(Long id){
    Response response = new Response();
    if(id==null){
      response.setRetcode(ResponseCode.PARAMARTER_ERROR);
      response.setRetdesc("参数错误");
      return response;
    }

    try{
      StudentBinding studentBinding = studentBindingService.selectByPrimaryKey(id);
      response.setData(studentBinding);
      response.setRetcode(ResponseCode.SUCCESS);
      response.setRetdesc("查询成功");
    }catch (Exception e){
      e.printStackTrace();
      response.setRetcode(ResponseCode.FAILED);
      response.setRetdesc("查询异常");
    }
    return response;
  }

  /**
   * 验证@Transaction注解是否好用
   * @param id
   * @return
   */
  @RequestMapping("validTransaction")
  @ResponseBody
  public Response validTransaction(Long id){
    Response response = new Response();
    if(id==null){
      response.setRetcode(ResponseCode.PARAMARTER_ERROR);
      response.setRetdesc("参数错误");
      return response;
    }

    try{
      studentBindingService.validTransaction(id);
      response.setRetcode(ResponseCode.SUCCESS);
    }catch (Exception e){
      e.printStackTrace();
      response.setRetcode(ResponseCode.FAILED);
    }
    return response;
  }

  /**
   * 渲染jsp页面
   * @return
   */
  @RequestMapping("welcomeIndex")
  public ModelAndView welcomeIndex(){
    List studentBindings = studentBindingService.getStudentBindByQuery(new StudentBinding());
//    model.addAttribute("studentBindings",studentBindings);
    ModelAndView mv = new ModelAndView();
    mv.setViewName("welcome");
    mv.addObject("studentBindings",studentBindings);
    return mv;
  }

  /**
   * 跳转到上传文件页面
   * @return
   */
  @RequestMapping("multipartIndex")
  public String multipartIndex(){
    return "multipart-index";
  }

  /**
   * 上传文件到指定目录
   * @param file
   * @return
   */
  @RequestMapping("/upload")
  @ResponseBody
  public Response upload(@RequestParam("file") MultipartFile file){
    Response response = new Response();
    if (file.isEmpty()){
      response.setRetcode(ResponseCode.PARAMARTER_ERROR);
      response.setRetdesc("参数错误");
      return response;
    }

    try {
      String filePath = "D:ceshiupload";
      File dir = new File(filePath);
      if(!dir.isDirectory()){
        dir.mkdir();
      }

      String fileOriginalName = file.getOriginalFilename();
      File writeFile = new File(filePath + fileOriginalName);
      //文件写入磁盘
      file.transferTo(writeFile);

      response.setRetcode(ResponseCode.SUCCESS);
      response.setRetdesc("上传成功");
    } catch (IOException e) {
      e.printStackTrace();
      response.setRetcode(ResponseCode.FAILED);
      response.setRetdesc("上传失败");
    }

    return response;
  }
}
重启项目之后,就可以访问各个接口
springboot配置事务
springboot配置事务有两种方式
1、在SpringbootdemoApplication.java项目入口,添加@EnableTransactionManagement的注解用来开启事务
2、在service实现类上添加@Transactional注解,那么该类的所有方法都进行事务管理;也可以直接在service实现类的方法上直接添加@Transactional注解,那么只对该方法进行事务管理,上面代码中有对方法添加事务的例子
springboot打包进行tomcat部署
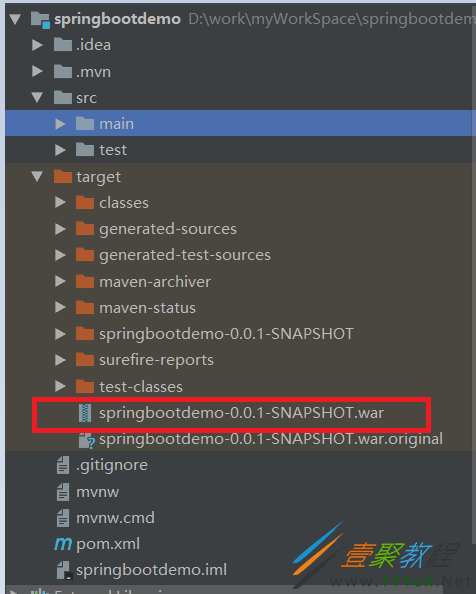
Edit Configuration -> Maven -> 添加 ->启动 -> 复制war包 -> tomcat webapp ->修改war包的名字 -> tomcat bin -> startup.bat
tomcat启动之后,访问 http://loc*a**lhost:8080/springbootdemo/welcome/welcomeIndex 进行验证

