ASP.NETCore中间件
1.前言
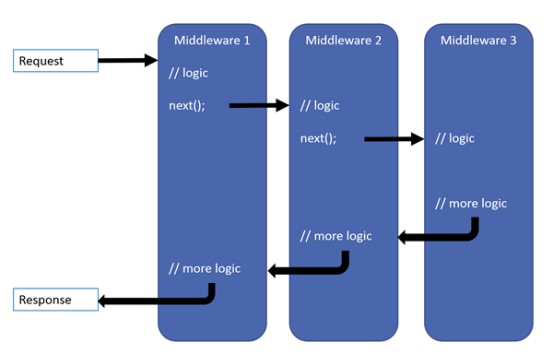
整个HTTP Request请求跟HTTP Response返回结果之间的处理流程是一个请求管道(request pipeline)。而中间件(middleware)则是一种装配到请求管道以处理请求和响应的组件。每个组件:
可选择是否将请求传递到管道中的下一个组件。可在管道中的下一个组件前后执行工作。中间件(middleware)处理流程如下图所示:
2.使用中间件
ASP.NET Core请求管道中每个中间件都包含一系列的请求委托(request delegates)来处理每个HTTP请求,依次调用。请求委托通过使用IApplicationBuilder类型的Run、Use和Map扩展方法在Strartup.Configure方法中配置。下面我们通过配置Run、Use和Map扩展方法示例来了解下中间件。
2.1 Run
public class Startup{public void Configure(IApplicationBuilder app){//第一个请求委托Runapp.Run(async context =>//内嵌匿名方法{await context.Response.WriteAsync("Hello, World!");});//第二个请求委托Runapp.Run(async context =>//内嵌匿名方法{await context.Response.WriteAsync("Hey, World!");});}}
响应结果:
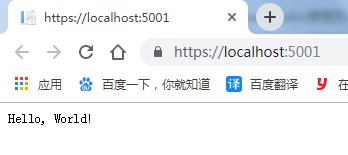
由上述代码可知,Run方法指定为一个内嵌匿名方法(称为并行中间件,in-line middleware),而内嵌匿名方法中并没有指定执行下一个请求委托,这一个过程叫管道短路,而该中间件又叫“终端中间件”(terminal middleware),因为它阻止中间件下一步处理请求。所以在Run第一个请求委托的时候就已经终止请求,并没有执行第二个请求委托直接返回Hello, World!输出文本。而根据官网解释,Run是一种约定,有些中间件组件可能会暴露他们自己的Run方法,而这些方法只能在管道末尾处运行(也就是说Run方法只在中间件执行最后一个请求委托时才使用)。
2.2 Use
public void Configure(IApplicationBuilder app){app.Use(async (context, next) =>{context.Response.ContentType = "text/plain; charset=utf-8";await context.Response.WriteAsync("进入第一个委托 执行下一个委托之前rn");//调用管道中的下一个委托await next.Invoke();await context.Response.WriteAsync("结束第一个委托 执行下一个委托之后rn");});app.Run(async context =>{await context.Response.WriteAsync("进入第二个委托rn");await context.Response.WriteAsync("Hello from 2nd delegate.rn");await context.Response.WriteAsync("结束第二个委托rn");});}
响应结果:
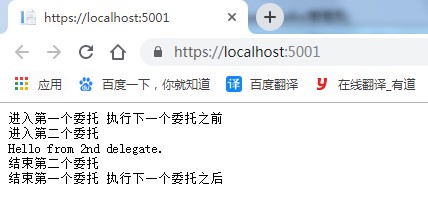
由上述代码可知,Use方法将多个请求委托链接在一起。而next参数表示管道中的下一个委托。如果不调用next参数调用下一个请求委托则会使管道短路。比如,一个授权(authorization)中间件只有通过身份验证之后才能调用下一个委托,否则它就会被短路,并返回“Not Authorized”的响应。所以应尽早在管道中调用异常处理委托,这样它们就能捕获在管道的后期阶段发生的异常。
2.3 Map和MapWhen
Map:Map扩展基于请求路径创建管道分支。MapWhen:MapWhen扩展基于请求条件创建管道分支。Map示例:
public class Startup{private static void HandleMapTest1(IApplicationBuilder app){app.Run(async context =>{await context.Response.WriteAsync("Map Test 1");});}private static void HandleMapTest2(IApplicationBuilder app){app.Run(async context =>{await context.Response.WriteAsync("Map Test 2");});}public void Configure(IApplicationBuilder app){app.Map("/map1", HandleMapTest1);app.Map("/map2", HandleMapTest2);app.Run(async context =>{await context.Response.WriteAsync("Hello from non-Map delegate. <p>");});}}
下面表格使用前面的代码显示来自http://loca*l*host:*5001的请求和响应。
请求
响应
localhost:5001
Hello from non-Map delegate.
localhost:5001/map1
Map Test 1
localhost:5001/map2
Map Test 2
localhost:5001/map3
Hello from non-Map delegate.
由上述代码可知,Map方法将从HttpRequest.Path中删除匹配的路径段,并针对每个请求将该路径追加到HttpRequest.PathBase。也就是说当我们在浏览器上输入map1请求地址的时候,系统会执行map1分支管道输出其请求委托信息,同理执行map2就会输出对应请求委托信息。MapWhen示例:
public class Startup{private static void HandleBranch(IApplicationBuilder app){app.Run(async context =>{var branchVer = context.Request.Query["branch"];await context.Response.WriteAsync($"Branch used = {branchVer}");});}public void Configure(IApplicationBuilder app){app.MapWhen(context => context.Request.Query.ContainsKey("branch"), HandleBranch);app.Run(async context =>{await context.Response.WriteAsync("Hello from non-Map delegate. <p>");});}}
下面表格使用前面的代码显示来自http://loca*l*host:*5001的请求和响应。
请求
响应
http://loca*l*host:*5001
Hello from non-Map delegate. <p>
https://*loc*alhost*:5001/?branch=master
Branch used = master
由上述代码可知,MapWhen是基于branch条件而创建管道分支的,我们在branch条件上输入master就会创建其对应管道分支。也就是说,branch条件上输入任何一个字符串条件,都会创建一个新的管理分支。而且还Map支持嵌套,例如:
public void Configure(IApplicationBuilder app){app.Map("/level1", level1App => {level1App.Map("/level2a", level2AApp => {// "/level1/level2a" processing});level1App.Map("/level2b", level2BApp => {// "/level1/level2b" processing});});}
还可同时匹配多个段:
public class Startup{private static void HandleMultiSeg(IApplicationBuilder app){app.Run(async context =>{await context.Response.WriteAsync("Map multiple segments.");});}public void Configure(IApplicationBuilder app){app.Map("/map1/seg1", HandleMultiSeg);app.Run(async context =>{await context.Response.WriteAsync("Hello from non-Map delegate.");});}}
3.顺序
向Startup.Configure方法添加中间件组件的顺序定义了在请求上调用它们的顺序,以及响应的相反顺序。此排序对于安全性、性能和功能至关重要。以下Startup.Configure方法将为常见应用方案添加中间件组件:
异常/错误处理(Exception/error handling)HTTP严格传输安全协议(HTTP Strict Transport Security Protocol)HTTPS重定向(HTTPS redirection)静态文件服务器(Static file server)Cookie策略实施(Cookie policy enforcement)身份验证(Authentication)会话(Session)MVC请看如下代码:
public void Configure(IApplicationBuilder app){if (env.IsDevelopment()){// When the app runs in the Development environment:// Use the Developer Exception Page to report app runtime errors.// Use the Database Error Page to report database runtime errors.app.UseDeveloperExceptionPage();app.UseDatabaseErrorPage();}else{// When the app doesn't run in the Development environment:// Enable the Exception Handler Middleware to catch exceptions// thrown in the following middlewares.// Use the HTTP Strict Transport Security Protocol (HSTS)// Middleware.app.UseExceptionHandler("/Error");app.UseHsts();}// Return static files and end the pipeline.app.UseStaticFiles();// Authenticate before the user accesses secure resources.app.UseAuthentication();}
从上述示例代码中,每个中间件扩展方法都通过Microsoft.AspNetCore.Builder命名空间在 IApplicationBuilder上公开。但是为什么我们要按照这个顺序去添加中间件组件呢?下面我们挑几个中间件来了解下。
UseExceptionHandler(异常/错误处理)是添加到管道的第一个中间件组件。因此我们可以捕获在应用程序调用中发生的任何异常。那为什么要将异常/错误处理放在第一位呢?那是因为这样我们就不用担心因前面中间件短路而导致捕获不到整个应用程序所有异常信息。UseStaticFiles(静态文件)中间件在管道中提前调用,方便它可以处理请求和短路,而无需通过剩余中间组件。也就是说静态文件中间件不用经过UseAuthentication(身份验证)检查就可以直接访问,即可公开访问由静态文件中间件服务的任何文件,包括wwwroot下的文件。UseAuthentication(身份验证)仅在MVC选择特定的Razor页面或Controller和Action之后才会发生。经过上面描述,大家都了解中间件顺序的重要性了吧。
4.编写中间件(重点)
虽然ASP.NET Core为我们提供了一组丰富的内置中间件组件,但在某些情况下,你可能需要写入自定义中间件。
4.1中间件类
下面我们自定义一个查询当前区域性的中间件:
public class Startup{public void Configure(IApplicationBuilder app){app.Use((context, next) =>{var cultureQuery = context.Request.Query["culture"];if (!string.IsNullOrWhiteSpace(cultureQuery)){var culture = new CultureInfo(cultureQuery);CultureInfo.CurrentCulture = culture;CultureInfo.CurrentUICulture = culture;}// Call the next delegate/middleware in the pipelinereturn next();});app.Run(async (context) =>{await context.Response.WriteAsync($"Hello {CultureInfo.CurrentCulture.DisplayName}");});}}
可通过传入区域性参数条件进行测试。例如http://l*oca*l*host:7997/?culture=zh、http://localhost:7997/?culture=en。但是如果每个自定义中间件都在Startup.Configure方法中编写如上一大堆代码,那么对于程序来说,将是灾难性的(不利于维护和调用)。为了更好管理代码,我们应该把内嵌匿名方法封装到新建的自定义类(示例自定义RequestCultureMiddleware类)里面去:
public class RequestCultureMiddleware{private readonly RequestDelegate _next;public RequestCultureMiddleware(RequestDelegate next){_next = next;}public async Task InvokeAsync(HttpContext context){context.Response.ContentType = "text/plain; charset=utf-8";var cultureQuery = context.Request.Query["culture"];if (!string.IsNullOrWhiteSpace(cultureQuery)){var culture = new CultureInfo(cultureQuery);CultureInfo.CurrentCulture = culture;CultureInfo.CurrentUICulture = culture;}// Call the next delegate/middleware in the pipelineawait _next(context);}}
通过Startup.Configure方法调用中间件:
public class Startup{public void Configure(IApplicationBuilder app){app.UseMiddleware<RequestCultureMiddleware>();app.Run(async (context) =>{await context.Response.WriteAsync($"Hello {CultureInfo.CurrentCulture.DisplayName}");});}}
4.2中间件扩展方法
Startup.Configure方法调用中间件设置可以通过自定义的扩展方法将其公开(调用内置IApplicationBuilder公开中间件)。示例创建一个RequestCultureMiddlewareExtensions扩展类并通过IApplicationBuilder公开:
public static class RequestCultureMiddlewareExtensions{public static IApplicationBuilder UseRequestCulture(this IApplicationBuilder builder){return builder.UseMiddleware<RequestCultureMiddleware>();}}
再通过Startup.Configure方法调用中间件:
public class Startup{public void Configure(IApplicationBuilder app){app.UseRequestCulture();app.Run(async (context) =>{await context.Response.WriteAsync($"Hello {CultureInfo.CurrentCulture.DisplayName}");});}}
响应结果:
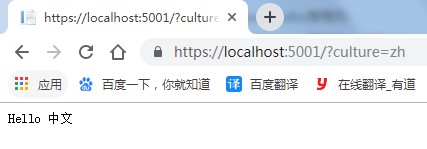
通过委托构造中间件,应用程序在运行时创建这个中间件,并将它添加到管道中。这里需要注意的是,中间件的创建是单例的,每个中间件在应用程序生命周期内只有一个实例。那么问题来了,如果我们业务逻辑需要多个实例时,该如何操作呢?请继续往下看。
5.按每次请求创建依赖注入(DI)
在中间件的创建过程中,内置的IOC容器会为我们创建一个中间件实例,并且整个应用程序生命周期中只会创建一个该中间件的实例。通常我们的程序不允许这样的注入逻辑。其实,我们可以把中间件理解成业务逻辑的入口,真正的业务逻辑是通过Application Service层实现的,我们只需要把应用服务注入到Invoke方法中即可。ASP.NET Core为我们提供了这种机制,允许我们按照请求进行依赖的注入,也就是每次请求创建一个服务。示例:
public class CustomMiddleware{private readonly RequestDelegate _next;public CustomMiddleware(RequestDelegate next){_next = next;}// IMyScopedService is injected into Invokepublic async Task Invoke(HttpContext httpContext, IMyScopedService svc){svc.MyProperty(1000);await _next(httpContext);}}public static class CustomMiddlewareExtensions{public static IApplicationBuilder UseCustomMiddleware(this IApplicationBuilder builder){return builder.UseMiddleware<CustomMiddleware>();}}public interface IMyScopedService{void MyProperty(decimal input);}public class MyScopedService : IMyScopedService{public void MyProperty(decimal input){Console.WriteLine("MyProperty is " + input);}}public void ConfigureServices(IServiceCollection services){//注入DI服务services.AddScoped<IMyScopedService, MyScopedService>();}
响应结果:

到此这篇关于ASP.NET Core中间件的文章就介绍到这了。希望对大家的学习有所帮助,也希望大家多多支持一聚教程网。
相关文章
-
DeepSeek多模态怎么样及保姆级配置教程(codex、claude)实用指南
游戏攻略 2026-10-17
-
WSL2+Docker+Ollama本地部署大模型思路和实践指南(Qwen1.8b)实用指南
游戏攻略 2026-10-17
-
DeepSeek Harness热门插件盘点:10个实用插件,覆盖多Agent、上下文和多模态实用指南
游戏攻略 2026-10-17
-
grep文本搜索与正则表达式完整代码示例实用指南
游戏攻略 2026-10-16
-
AI漫剧伪装直男1‑24集无雾版夸克网盘资源免费分享
游戏攻略 2026-10-15
-
AI漫剧玉僧入尘1-68集无雾无删版夸克网盘资源免费分享
游戏攻略 2026-10-15