web service的调用过程
1.不通过client stub调用web service
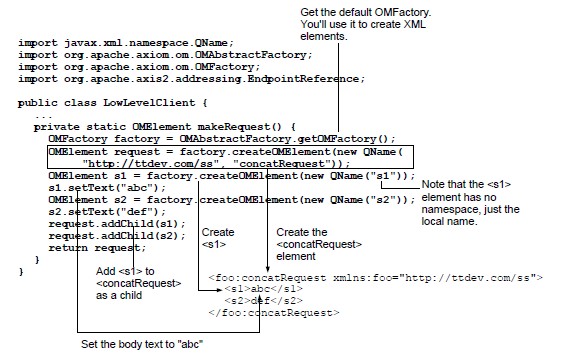
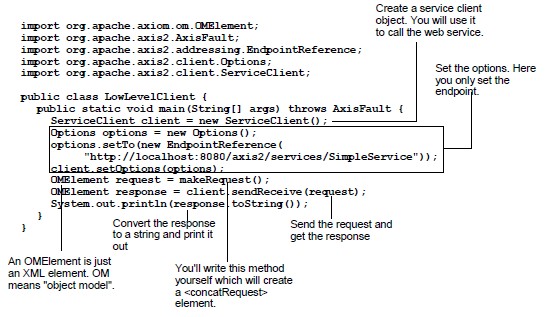
假设我们不想通过client stub调用一个web service。我们可以在simpleservice工程中创建一个lowlevelclient.java文件,并把其放入com.ttdev.ss.lowlevel包中:
定义makerequest()方法:
运行程序文件,正常工作。这个程序使用了被称为axiom(axis2 object model)的底层api。通常这样没有使用client stub更容易理解。然而如果需要一些更特殊的自定义操作,必须要通过axiom才能实现。
2.再看soap消息
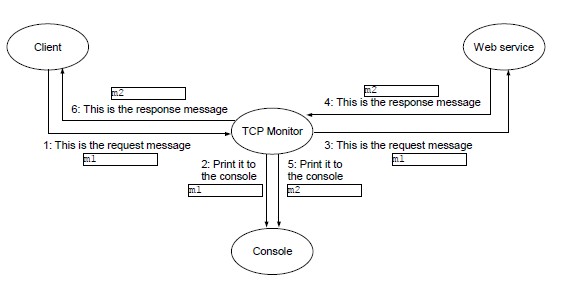
接下来,让我们看看真实的soap消息。如何看到实际中的soap消息呢?我们要借助于一个名称为“tcp monitor”的程序。它的工作原理如下图所示。告知客户端把tcp monitor当作访问目的地(destination).当客户端需要发送一个请求消息时,消息会传递给tcp monitor。tcp monitor会把接收到的消息打印到控制台上然后把消息转发给真实的访问目的地址(real destination即web service)。当web service 返回一个响应消息,会把消息先传递给tcp monitor。tcp monitor响应消息,并把消息转发给客户端。
以上我们说了一通原理,那么如何实际操作呢?去这里下载tcp monitor的二进制分发版。假设程序包是tcpmon-1.0-bin.zip。解压到c:tcpmon.在命令行窗口中,进入目录c:tcpmonbuild然后运行文件tcpmon.bat:
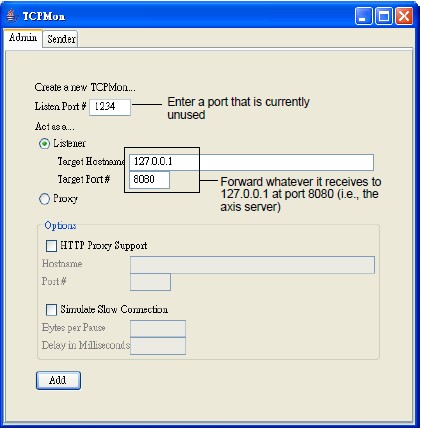
这里需要注意的是直接运行文件c:tcpmonbuildtcpmon.bat程序不会正常工作;必须在当前文件夹c:tcpmonbuild下运行才可以。程序运行后,会出现一个窗口,按照下面的提示进行数据输入:
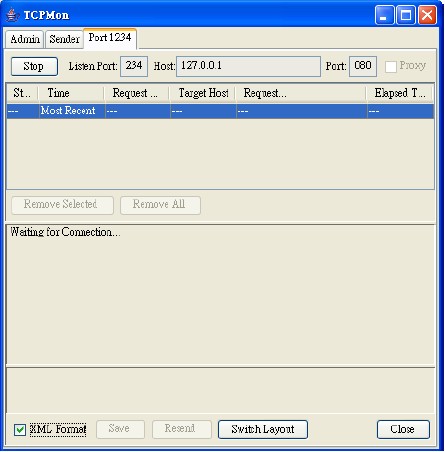
单击”add”按钮,将会打开一个新的tab页(如下图).这时,tcp monitor会监听1234端口。选中”xml format”选项。这种方式会把tcp connection(一个包含了soap请求的http请求)的内容以xml格式打印出来。
再客户端,我们需要告知访问endpoint的地址为localhost:1234。比如在类文件lowlevelclient.java:
 代码
代码
public static void main(string[] args) throws axisfault {
serviceclient client = new serviceclient();
options options = new options();
options.setto(new endpointreference(
http://***localhost:1234/axis2/services/simpleservice));
client.setoptions(options);
omelement request = makerequest();
omelement response = client.sendreceive(request);
system.out.println(response.tostring());
}
...
}
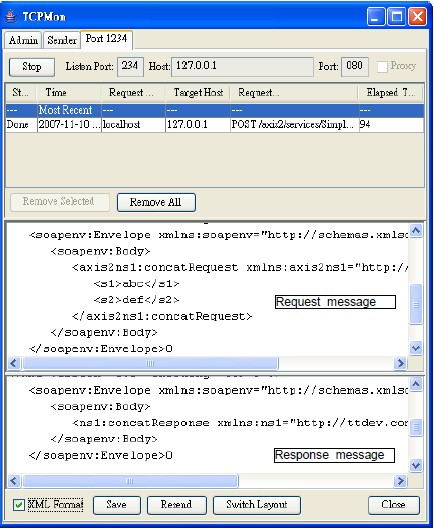
运行程序在tcp monitor中你将看到如下消息:
同样的道理,在simpleclient中可以用指定的endpoint地址覆盖默认的:
public class simpleclient {
public static void main(string[] args) throws remoteexception {
simpleservicestub service = new simpleservicestub(
"http://***localhost:1234/axis2/services/simpleservice");
concatrequest request = new concatrequest();
request.sets1("abc");
request.sets2("123");
concatresponse response = service.concat(request);
system.out.println(response.getconcatresponse());
}
}


