Openlayers图层按需分层渲染至不同Canvas画布
作者:袖梨
2026-06-04
Openlayers图层按需分层渲染到不同Canvas画布
各个库版本如下:
    "ol": "^10.9.0",
    "proj4": "^2.20.8",
    "vue3-openlayers": "^12.2.2"
1 合成渲染
Openlayers目前的渲染策略是合成渲染,即通过调度Canvas 2D和WebGL两个渲染管线,使用Composite渲染合成器将各个图层(切片图层、矢量图层等)按照不同渲染机制,最终将图像呈现在浏览器DOM中对应的Canvas画布上(默认Canvas 2D对应一个canvas,WebGL对应一个canvas)
- 优点是
默认简单场景下同一个渲染管线处理的数据只呈现在一个Canvas画布上(默认Canvas 2D对应一个canvas,WebGL对应一个canvas) - 缺点是使用css样式、动画对Canvas画布进行控制或者添加效果时会影响所有在画布上的元素(即所有合成在当前Canvas图层)
2 分层渲染
其实在早期版本(6.0及之前)的Openlayers中(包括其他早期版本ArcGis,Leaflet)都是按照图层分层渲染的,最终在DOM中的呈现就是每个图层对应不同DOM元素(Div,Canvas,Svg)
- 优点是可以直接使用css样式、动画对图层进行控制或者添加效果
- 缺点也是显而易见,当图层比较多,图层上的元素比较复杂时,会大量增加DOM元素
3 按需分层渲染
这里所谓的按需分层渲染,主要是想让Openlayers对特定图层进行分层渲染,将特定图层渲染到不同的Canvas画布上。目的就是为了方便使用CSS控制Canvas的样式
对应场景:
- 当选中矢量图形时,对切片图层使用黑暗模式
- 当选中矢量图形时,对目标图层使用CSS动画,过渡更改透明度
4 实现
实现按需分层渲染其实很简单,因为都是Openlayers已经实现的功能,只是对一些属性进行设置即可,具体如下(满足其一即可):
为图层设置不同的类名className(不设置时,默认所有图层类名为ol-layer)为图层设置不同的背景色background在加入地图的顺序上间隔使用Canvas 2D图层和WebGL图层
5 对比(Openlayers原生)
5.1 Openlayers默认合成渲染
5.1.1 渲染结果
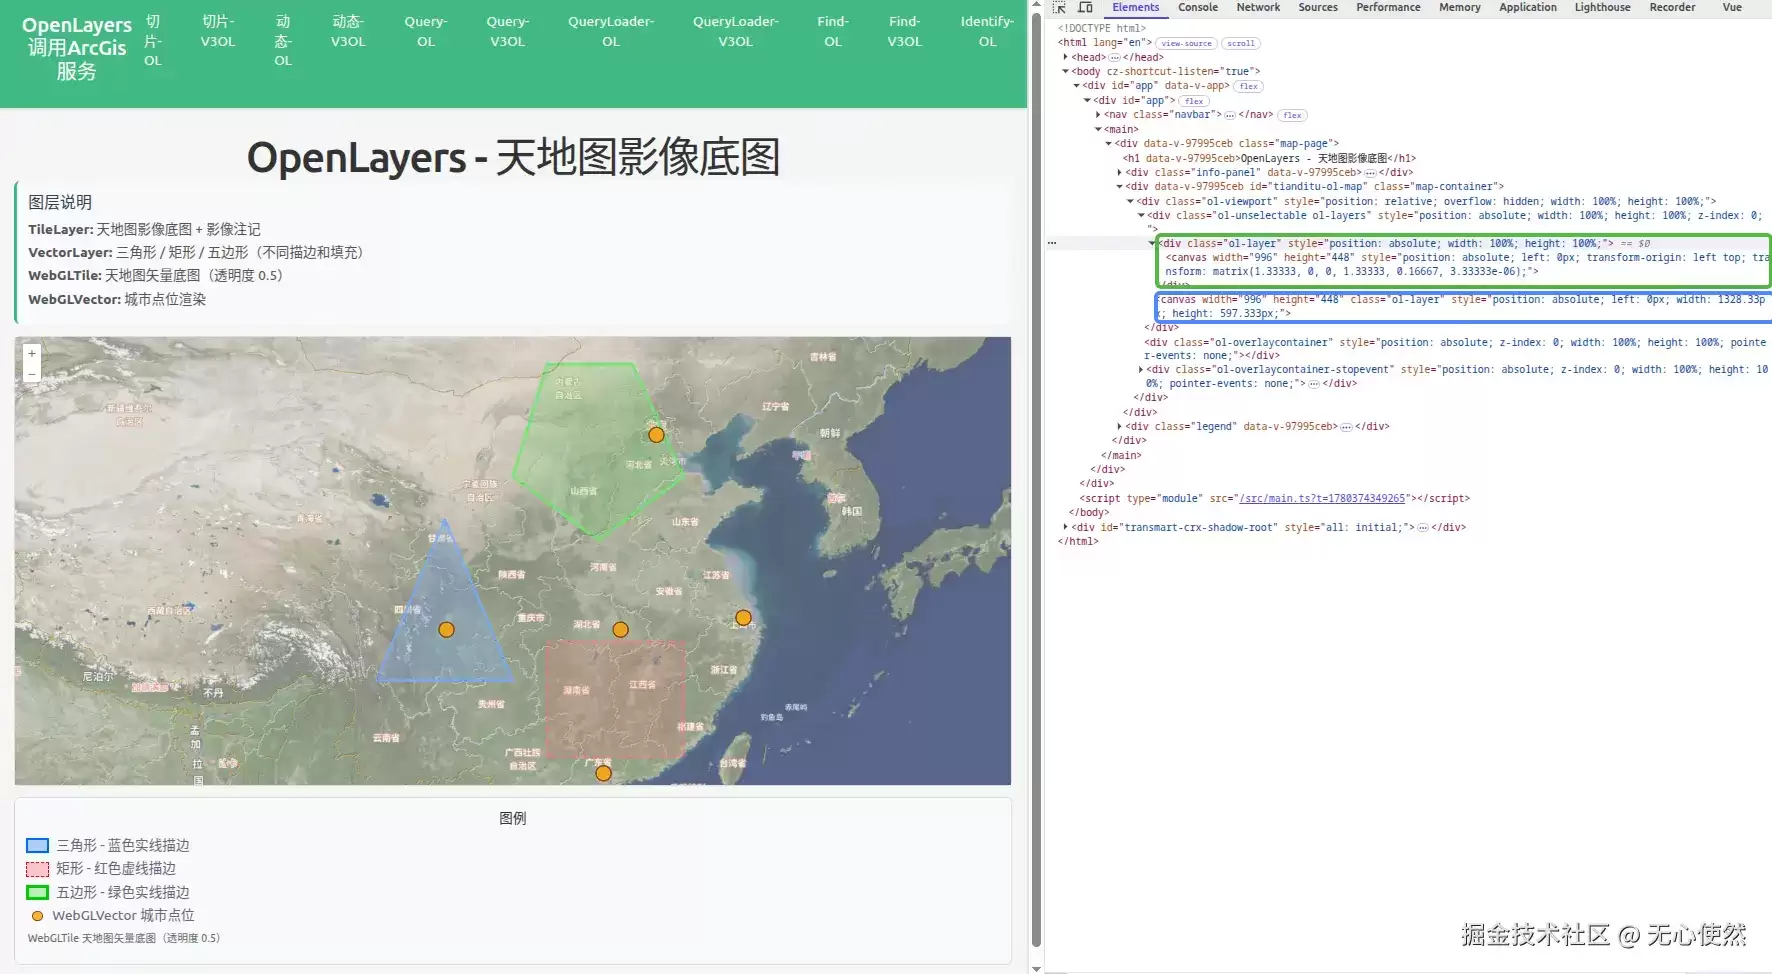
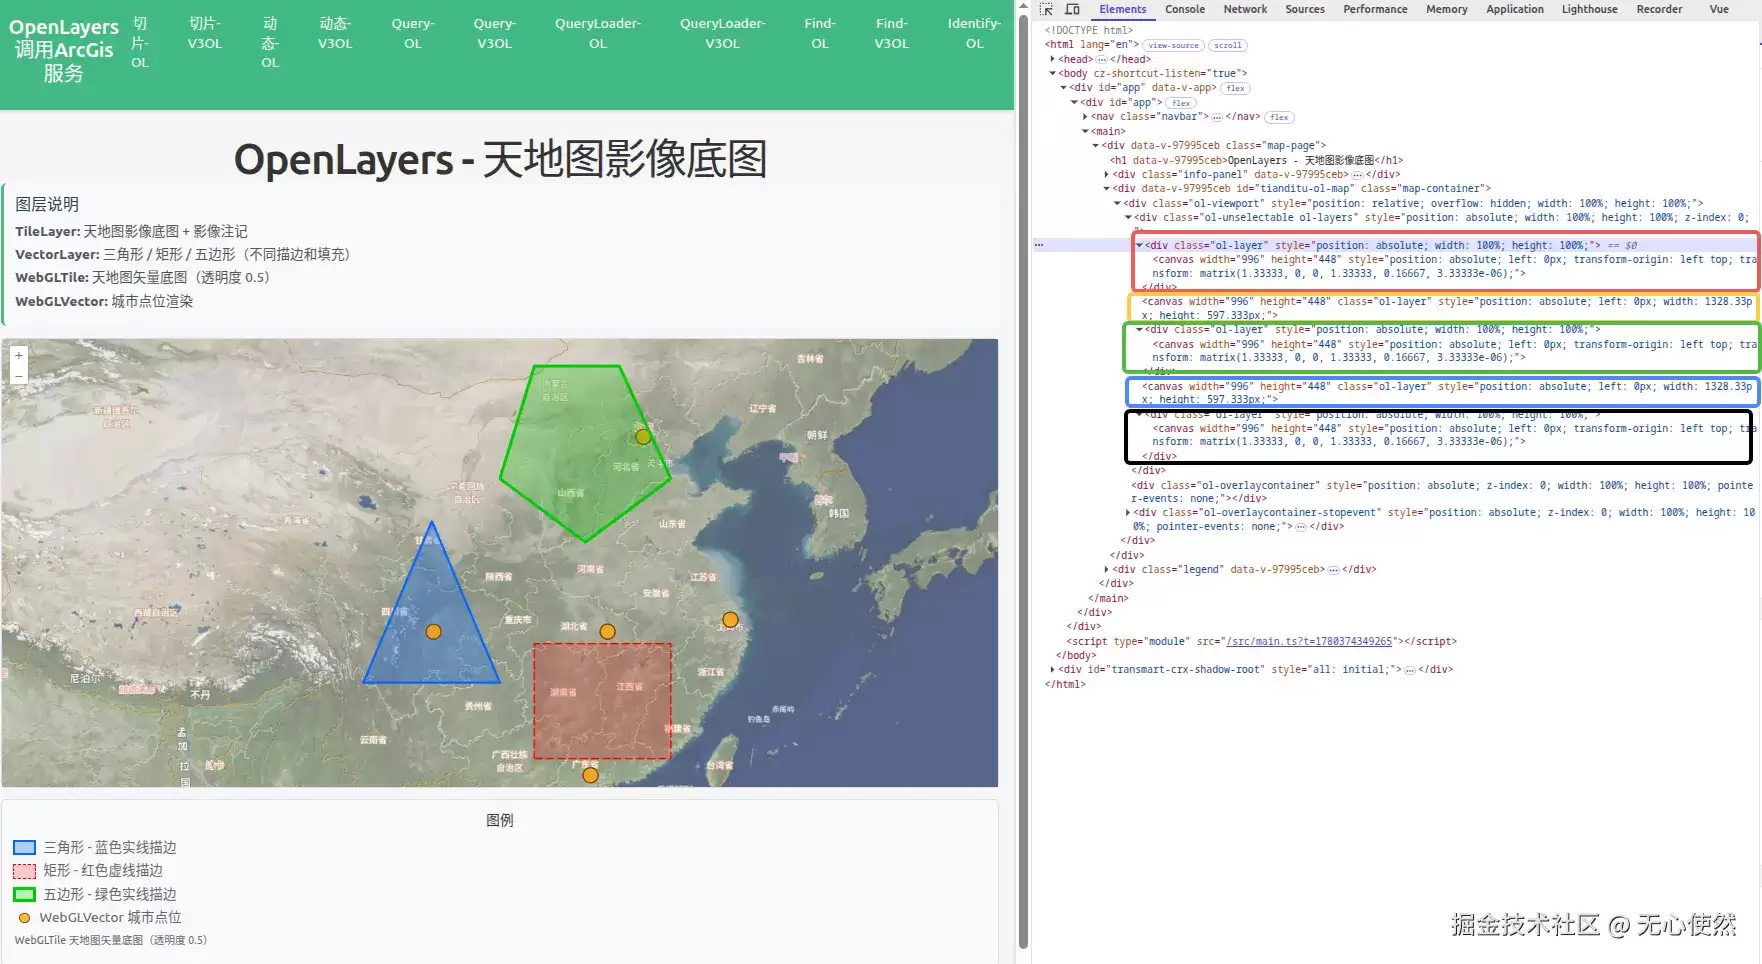
结合下面的代码可以发现:
- tiandituImgLayer,tiandituCiaLayer,vectorLayer1,vectorLayer2,vectorLayer3被合并渲染到了绿色框内的canvas中
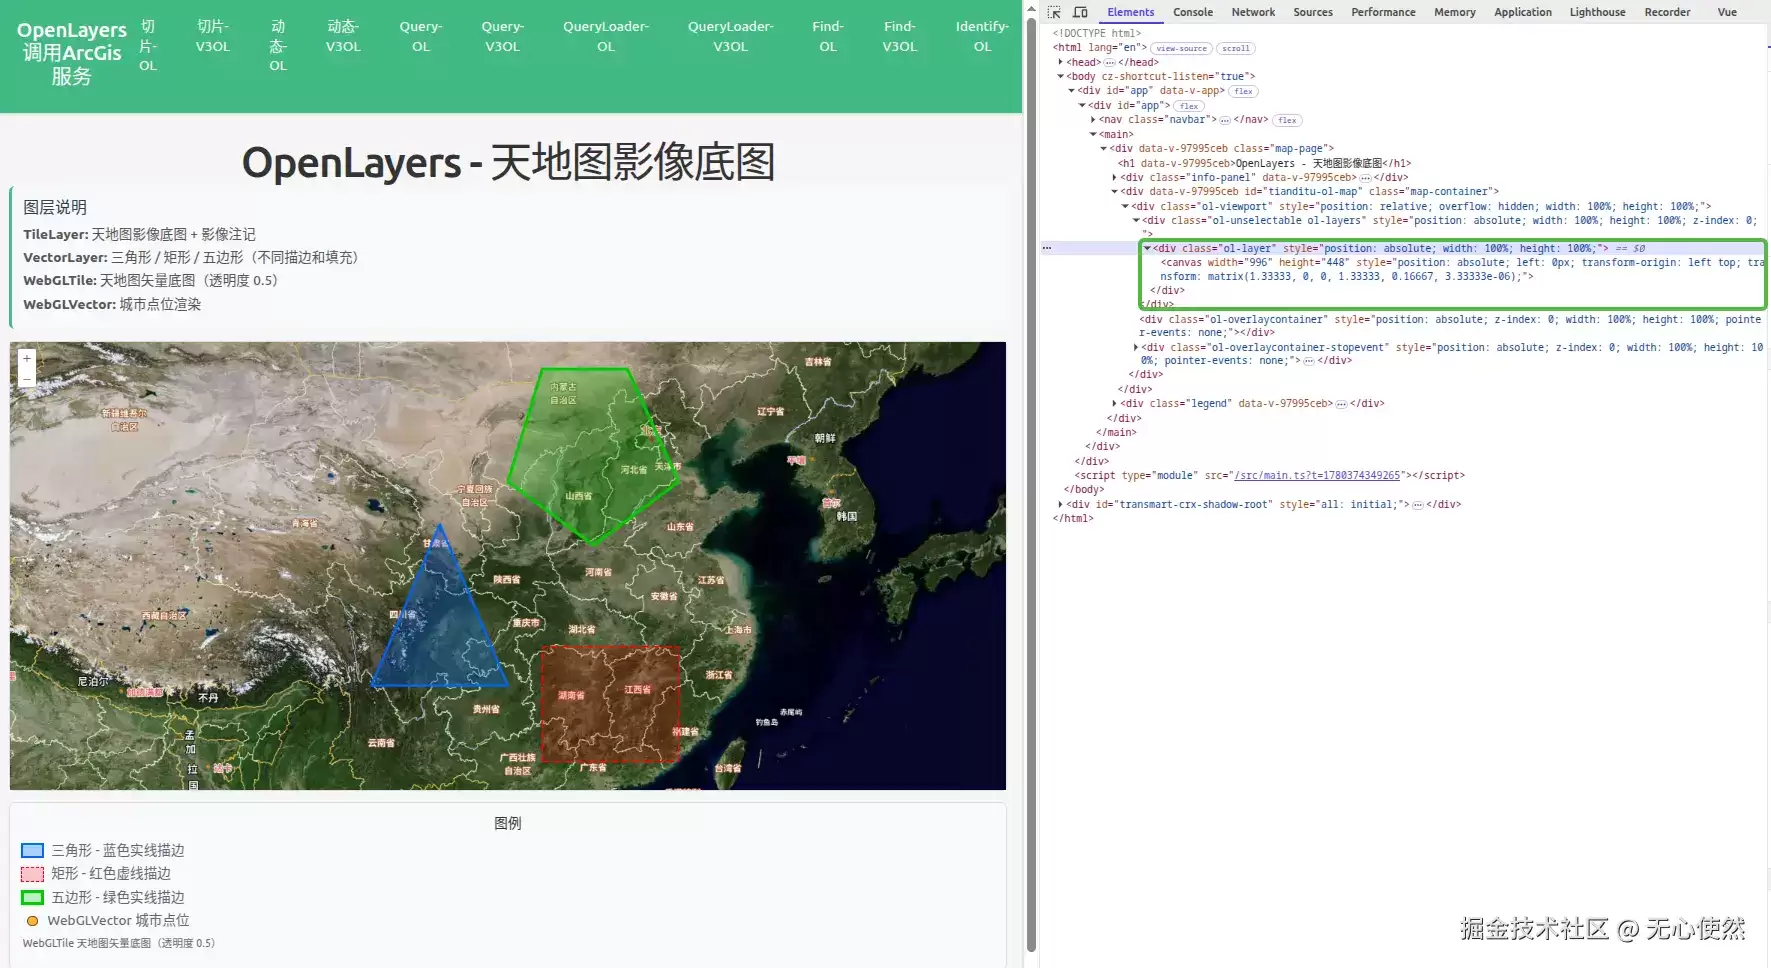
- webglTileLayer,webglVectorLayer被合并渲染到了蓝色框内的canvas中
作为对比,直接在DOM中
- 删除绿色框内的canvas:
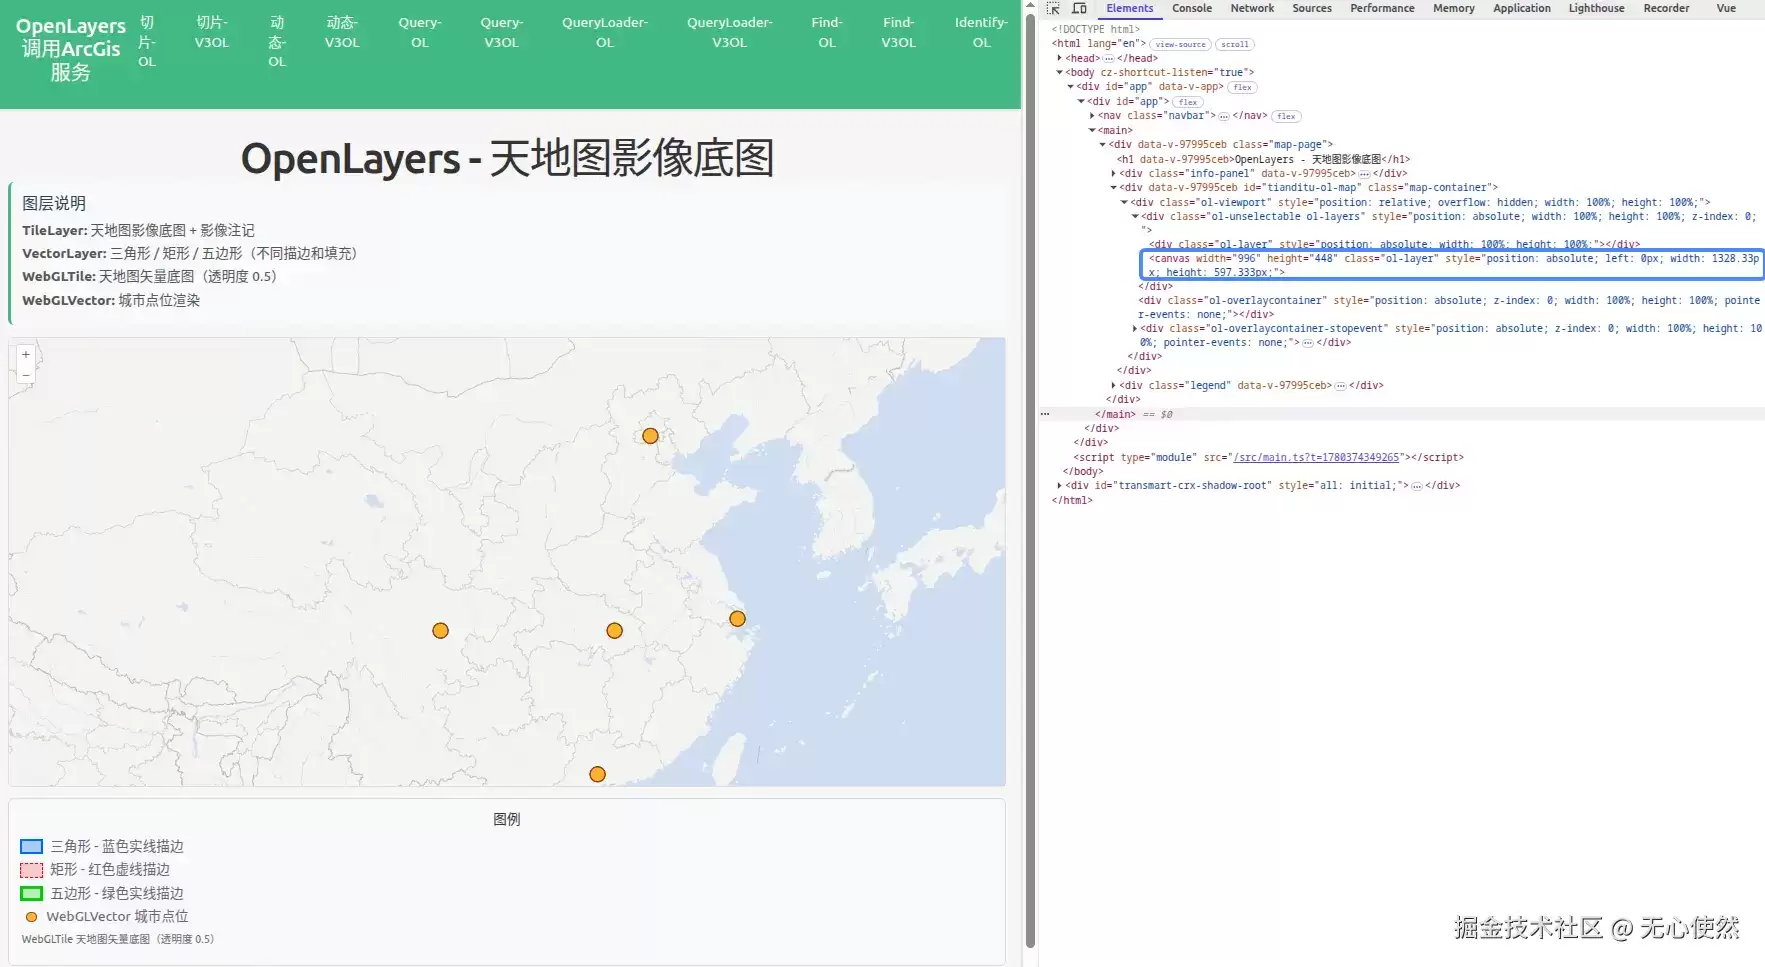
- 删除蓝色框内的canvas:
5.1.2 代码
<template>
  <div class="map-page">
    <h1>OpenLayers - 天地图影像底图</h1>
    <div class="info-panel">
      <h3>图层说明</h3>
      <p><strong>TileLayer:</strong> 天地图影像底图 + 影像注记</p>
      <p>
        <strong>VectorLayer:</strong> 三角形 / 矩形 / 五边形(不同描边和填充)
      </p>
      <p><strong>WebGLTile:</strong> 天地图矢量底图(透明度 0.5)</p>
      <p><strong>WebGLVector:</strong> 城市点位渲染</p>
    </div>
    <div id="tianditu-ol-map" ref="mapContainer" class="map-container"></div>
    <div class="legend">
      <h4>图例</h4>
      <div class="legend-item">
        <span
          class="legend-color"
          style="
            background-color: rgba(0, 102, 255, 0.3);
            border: 3px solid #0066ff;
          "
        ></span>
        <span>三角形 - 蓝色实线描边</span>
      </div>
      <div class="legend-item">
        <span
          class="legend-color"
          style="
            background-color: rgba(255, 0, 0, 0.2);
            border: 2px dashed #ff0000;
          "
        ></span>
        <span>矩形 - 红色虚线描边</span>
      </div>
      <div class="legend-item">
        <span
          class="legend-color"
          style="
            background-color: rgba(0, 204, 0, 0.25);
            border: 4px solid #00cc00;
          "
        ></span>
        <span>五边形 - 绿色实线描边</span>
      </div>
      <div class="legend-item">
        <span
          class="legend-dot"
          style="background-color: rgba(255, 165, 0, 0.8)"
        ></span>
        <span>WebGLVector 城市点位</span>
      </div>
      <div class="legend-item">
        <span class="legend-label">WebGLTile 天地图矢量底图(透明度 0.5)</span>
      </div>
    </div>
  </div>
</template><script setup lang="ts">
import { onMounted, onUnmounted, ref } from "vue";
import Map from "ol/Map";
import View from "ol/View";
import TileLayer from "ol/layer/Tile";
import VectorLayer from "ol/layer/Vector";
import VectorSource from "ol/source/Vector";
import { XYZ } from "ol/source";
import { Style, Fill, Stroke } from "ol/style";
import { Polygon, Point } from "ol/geom";
import Feature from "ol/Feature";
import { fromLonLat } from "ol/proj";
import WebGLTile from "ol/layer/WebGLTile";
import WebGLVector from "ol/layer/WebGLVector";// 天地图 Token(请替换为自己的 Token)
const TK = "";const mapContainer = ref<HTMLDivElement>();
let map: Map | null = null;// ===== 天地图影像底图 =====
const tiandituImgLayer = new TileLayer({
  source: new XYZ({
    url: `https://t{0-7}.tianditu.gov.cn/DataServer?T=img_w&x={x}&y={y}&l={z}&tk=${TK}`,
  }),
});// 天地图影像注记层
const tiandituCiaLayer = new TileLayer({
  source: new XYZ({
    url: `https://t{0-7}.tianditu.gov.cn/DataServer?T=cia_w&x={x}&y={y}&l={z}&tk=${TK}`,
  }),
});// ===== 三个矢量图层(不同形状、描边、填充) =====// 图层1: 三角形 - 蓝色实线描边, 浅蓝填充
const vectorLayer1 = new VectorLayer({
  source: new VectorSource({
    features: [
      new Feature({
        geometry: new Polygon([
          [
            fromLonLat([100, 28]),
            fromLonLat([108, 28]),
            fromLonLat([104, 36]),
            fromLonLat([100, 28]),
          ],
        ]),
      }),
    ],
  }),
  style: new Style({
    stroke: new Stroke({ color: "#0066FF", width: 3 }),
    fill: new Fill({ color: "rgba(0, 102, 255, 0.3)" }),
  }),
});// 图层2: 矩形 - 红色虚线描边, 浅红填充
const vectorLayer2 = new VectorLayer({
  source: new VectorSource({
    features: [
      new Feature({
        geometry: new Polygon([
          [
            fromLonLat([110, 24]),
            fromLonLat([118, 24]),
            fromLonLat([118, 30]),
            fromLonLat([110, 30]),
            fromLonLat([110, 24]),
          ],
        ]),
      }),
    ],
  }),
  style: new Style({
    stroke: new Stroke({ color: "#FF0000", width: 2, lineDash: [10, 5] }),
    fill: new Fill({ color: "rgba(255, 0, 0, 0.2)" }),
  }),
});// 图层3: 五边形 - 绿色实线描边, 浅绿填充
const vectorLayer3 = new VectorLayer({
  source: new VectorSource({
    features: [
      new Feature({
        geometry: new Polygon([
          [
            fromLonLat([108, 38]),
            fromLonLat([113, 35]),
            fromLonLat([118, 38]),
            fromLonLat([115, 43]),
            fromLonLat([110, 43]),
            fromLonLat([108, 38]),
          ],
        ]),
      }),
    ],
  }),
  style: new Style({
    stroke: new Stroke({ color: "#00CC00", width: 4 }),
    fill: new Fill({ color: "rgba(0, 204, 0, 0.25)" }),
  }),
});// ===== WebGLTile 图层 - 天地图矢量底图, 透明度 0.5 =====
const webglTileLayer = new WebGLTile({
  opacity: 0.5,
  source: new XYZ({
    url: `https://t{0-7}.tianditu.gov.cn/DataServer?T=vec_w&x={x}&y={y}&l={z}&tk=${TK}`,
  }) as any,
});// ===== WebGLVector 图层 - 城市点位 =====
const webglVectorLayer = new WebGLVector({
  source: new VectorSource({
    features: [
      new Feature({ geometry: new Point(fromLonLat([116.4, 39.9])) }),
      new Feature({ geometry: new Point(fromLonLat([121.5, 31.2])) }),
      new Feature({ geometry: new Point(fromLonLat([113.3, 23.1])) }),
      new Feature({ geometry: new Point(fromLonLat([104.1, 30.6])) }),
      new Feature({ geometry: new Point(fromLonLat([114.3, 30.6])) }),
    ],
  }),
  style: {
    "circle-radius": 10,
    "circle-fill-color": "rgba(255, 165, 0, 0.8)",
    "circle-stroke-color": "#8B4513",
    "circle-stroke-width": 2,
  },
});onMounted(() => {
  map = new Map({
    target: mapContainer.value!,
    layers: [
      tiandituImgLayer,
      tiandituCiaLayer,
      vectorLayer1,
      vectorLayer2,
      vectorLayer3,
      webglTileLayer,
      webglVectorLayer,
    ],
    view: new View({
      center: fromLonLat([108, 34]),
      zoom: 5,
    }),
  });
});onUnmounted(() => {
  if (map) {
    map.setTarget(undefined);
    map = null;
  }
});
</script><style scoped>
.map-page {
  padding: 20px;
}h1 {
  margin-bottom: 20px;
  color: #333;
}.info-panel {
  background-color: #f8f9fa;
  padding: 15px;
  border-radius: 8px;
  margin-bottom: 15px;
  border-left: 4px solid #42b983;
  text-align: left;
}.info-panel h3 {
  margin-top: 0;
  margin-bottom: 10px;
  color: #2c3e50;
}.info-panel p {
  margin: 5px 0;
  color: #555;
}.map-container {
  width: 100%;
  height: 600px;
  border: 2px solid #ddd;
  border-radius: 8px;
}.legend {
  margin-top: 15px;
  padding: 15px;
  background-color: #f8f9fa;
  border-radius: 8px;
  border: 1px solid #ddd;
}.legend h4 {
  margin-top: 0;
  margin-bottom: 10px;
  color: #333;
}.legend-item {
  display: flex;
  align-items: center;
  margin: 5px 0;
}.legend-color {
  width: 30px;
  height: 20px;
  margin-right: 10px;
  display: inline-block;
}.legend-dot {
  width: 14px;
  height: 14px;
  border-radius: 50%;
  margin-right: 13px;
  margin-left: 8px;
  border: 2px solid #8b4513;
  display: inline-block;
}.legend-label {
  font-size: 14px;
  color: #666;
  margin-left: 2px;
}
</style>
5.2 Openlayers按需分层渲染
5.2.1 设置类名和背景色
5.2.1.1 渲染结果
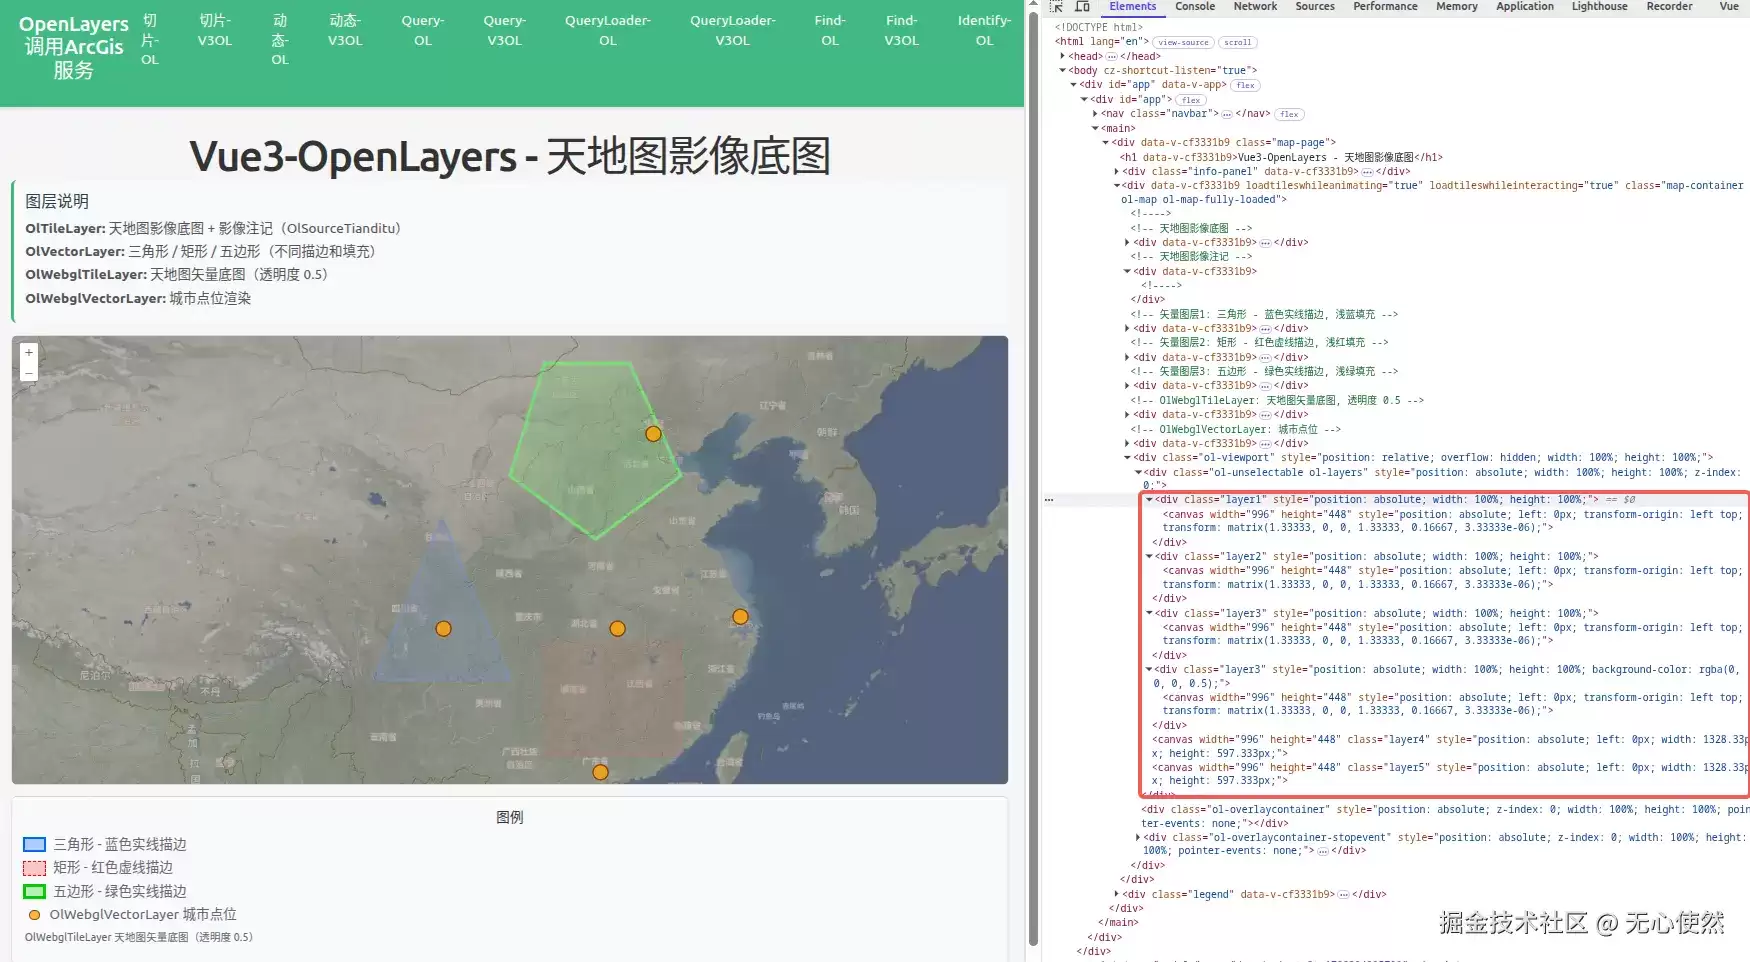
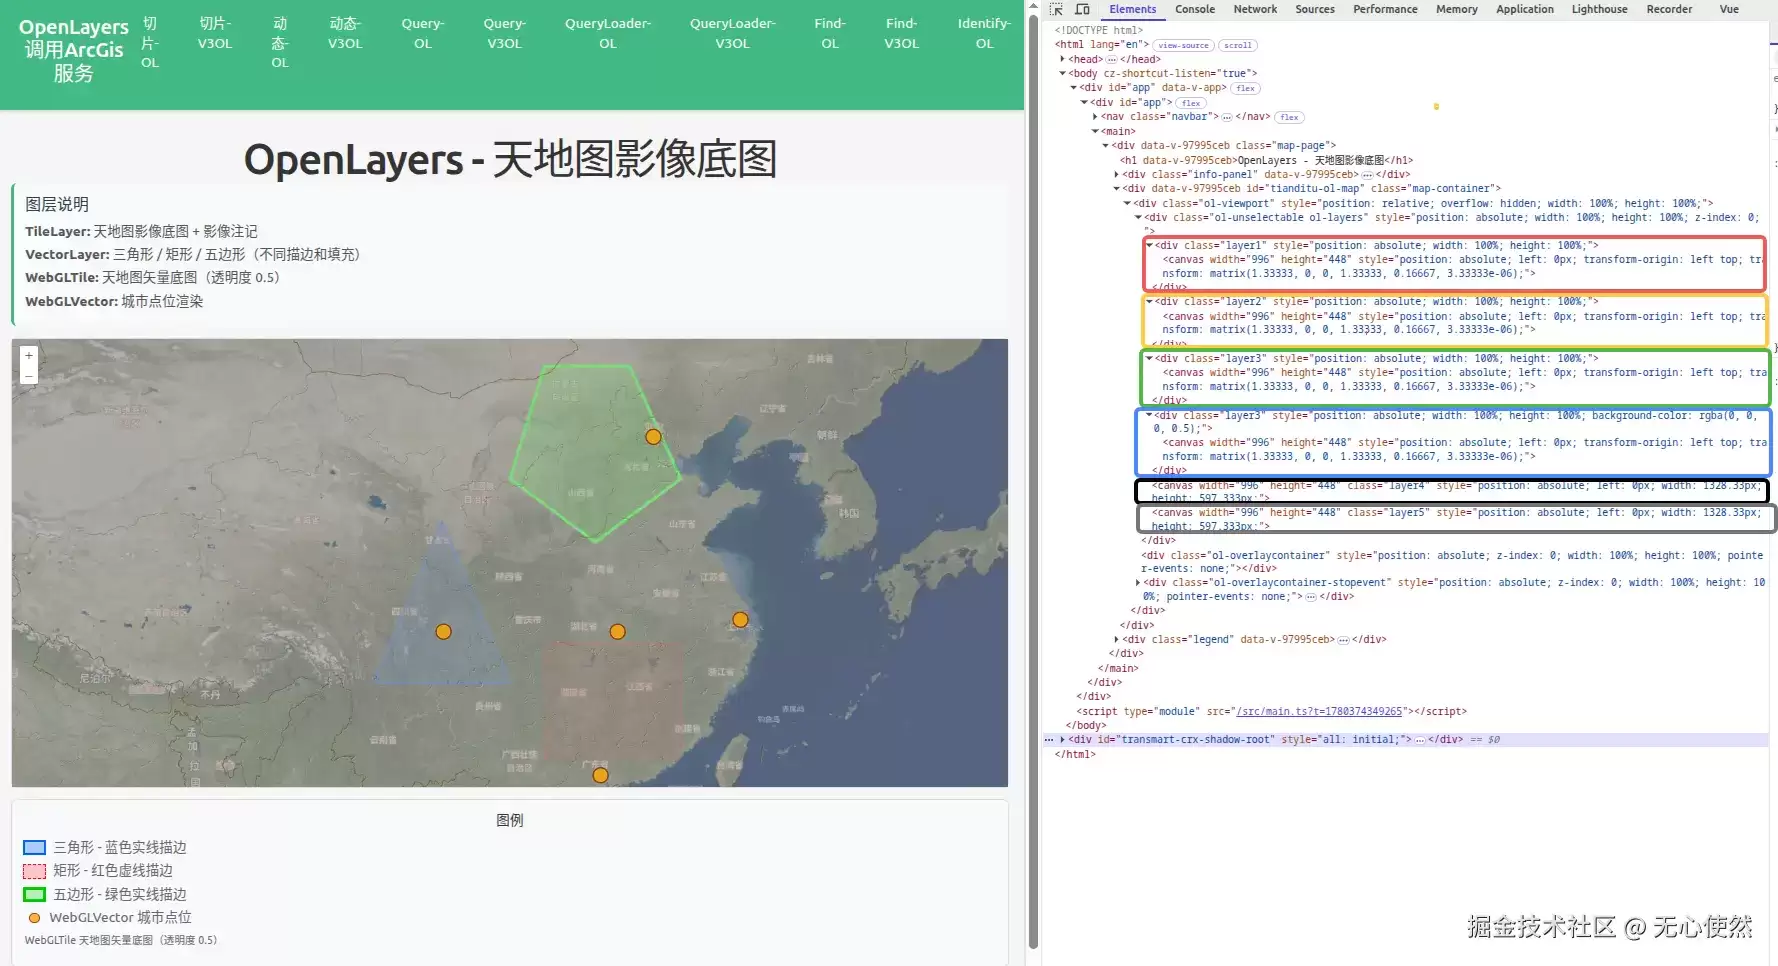 结合下面的代码可以发现:
- tiandituImgLayer,tiandituCiaLayer,类名都是layer1,被合并渲染到了红色框内的canvas中
- vectorLayer1,类名是layer2,被渲染到了橙色框内的canvas中
- vectorLayer2,类名是layer3,被渲染到了绿色框内的canvas中
- vectorLayer3,类名是layer3,但是设置背景色是rgba(0,0,0,0.5),被渲染到了蓝色框内的canvas中
- webglTileLayer,类名是layer4,被渲染到了黑色框内的canvas中
- webglVectorLayer,类名是layer5,被渲染到了灰色框内的canvas中
5.2.1.2 关键代码
// 省略上方代码
// ===== 天地图影像底图 =====
const tiandituImgLayer = new TileLayer({
  source: new XYZ({
    url: `https://t{0-7}.tianditu.gov.cn/DataServer?T=img_w&x={x}&y={y}&l={z}&tk=${TK}`,
  }),
  className: "layer1",
});// 天地图影像注记层
const tiandituCiaLayer = new TileLayer({
  source: new XYZ({
    url: `https://t{0-7}.tianditu.gov.cn/DataServer?T=cia_w&x={x}&y={y}&l={z}&tk=${TK}`,
  }),
  className: "layer1",
});// ===== 三个矢量图层(不同形状、描边、填充) =====// 图层1: 三角形 - 蓝色实线描边, 浅蓝填充
const vectorLayer1 = new VectorLayer({
  source: new VectorSource({
    features: [
      new Feature({
        geometry: new Polygon([
          [
            fromLonLat([100, 28]),
            fromLonLat([108, 28]),
            fromLonLat([104, 36]),
            fromLonLat([100, 28]),
          ],
        ]),
      }),
    ],
  }),
  style: new Style({
    stroke: new Stroke({ color: "#0066FF", width: 3 }),
    fill: new Fill({ color: "rgba(0, 102, 255, 0.3)" }),
  }),
  className: "layer2",
});// 图层2: 矩形 - 红色虚线描边, 浅红填充
const vectorLayer2 = new VectorLayer({
  source: new VectorSource({
    features: [
      new Feature({
        geometry: new Polygon([
          [
            fromLonLat([110, 24]),
            fromLonLat([118, 24]),
            fromLonLat([118, 30]),
            fromLonLat([110, 30]),
            fromLonLat([110, 24]),
          ],
        ]),
      }),
    ],
  }),
  style: new Style({
    stroke: new Stroke({ color: "#FF0000", width: 2, lineDash: [10, 5] }),
    fill: new Fill({ color: "rgba(255, 0, 0, 0.2)" }),
  }),
  className: "layer3",
});// 图层3: 五边形 - 绿色实线描边, 浅绿填充
const vectorLayer3 = new VectorLayer({
  source: new VectorSource({
    features: [
      new Feature({
        geometry: new Polygon([
          [
            fromLonLat([108, 38]),
            fromLonLat([113, 35]),
            fromLonLat([118, 38]),
            fromLonLat([115, 43]),
            fromLonLat([110, 43]),
            fromLonLat([108, 38]),
          ],
        ]),
      }),
    ],
  }),
  style: new Style({
    stroke: new Stroke({ color: "#00CC00", width: 4 }),
    fill: new Fill({ color: "rgba(0, 204, 0, 0.25)" }),
  }),
  className: "layer3",
  background: "rgba(0,0,0,0.5)",
});// ===== WebGLTile 图层 - 天地图矢量底图, 透明度 0.5 =====
const webglTileLayer = new WebGLTile({
  opacity: 0.5,
  source: new XYZ({
    url: `https://t{0-7}.tianditu.gov.cn/DataServer?T=vec_w&x={x}&y={y}&l={z}&tk=${TK}`,
  }) as any,
  className: "layer4",
});// ===== WebGLVector 图层 - 城市点位 =====
const webglVectorLayer = new WebGLVector({
  source: new VectorSource({
    features: [
      new Feature({ geometry: new Point(fromLonLat([116.4, 39.9])) }),
      new Feature({ geometry: new Point(fromLonLat([121.5, 31.2])) }),
      new Feature({ geometry: new Point(fromLonLat([113.3, 23.1])) }),
      new Feature({ geometry: new Point(fromLonLat([104.1, 30.6])) }),
      new Feature({ geometry: new Point(fromLonLat([114.3, 30.6])) }),
    ],
  }),
  style: {
    "circle-radius": 10,
    "circle-fill-color": "rgba(255, 165, 0, 0.8)",
    "circle-stroke-color": "#8B4513",
    "circle-stroke-width": 2,
  },
  className: "layer5",
});
// 省略下方代码
5.2.2 设置加入地图的顺序
5.2.2.1 渲染结果
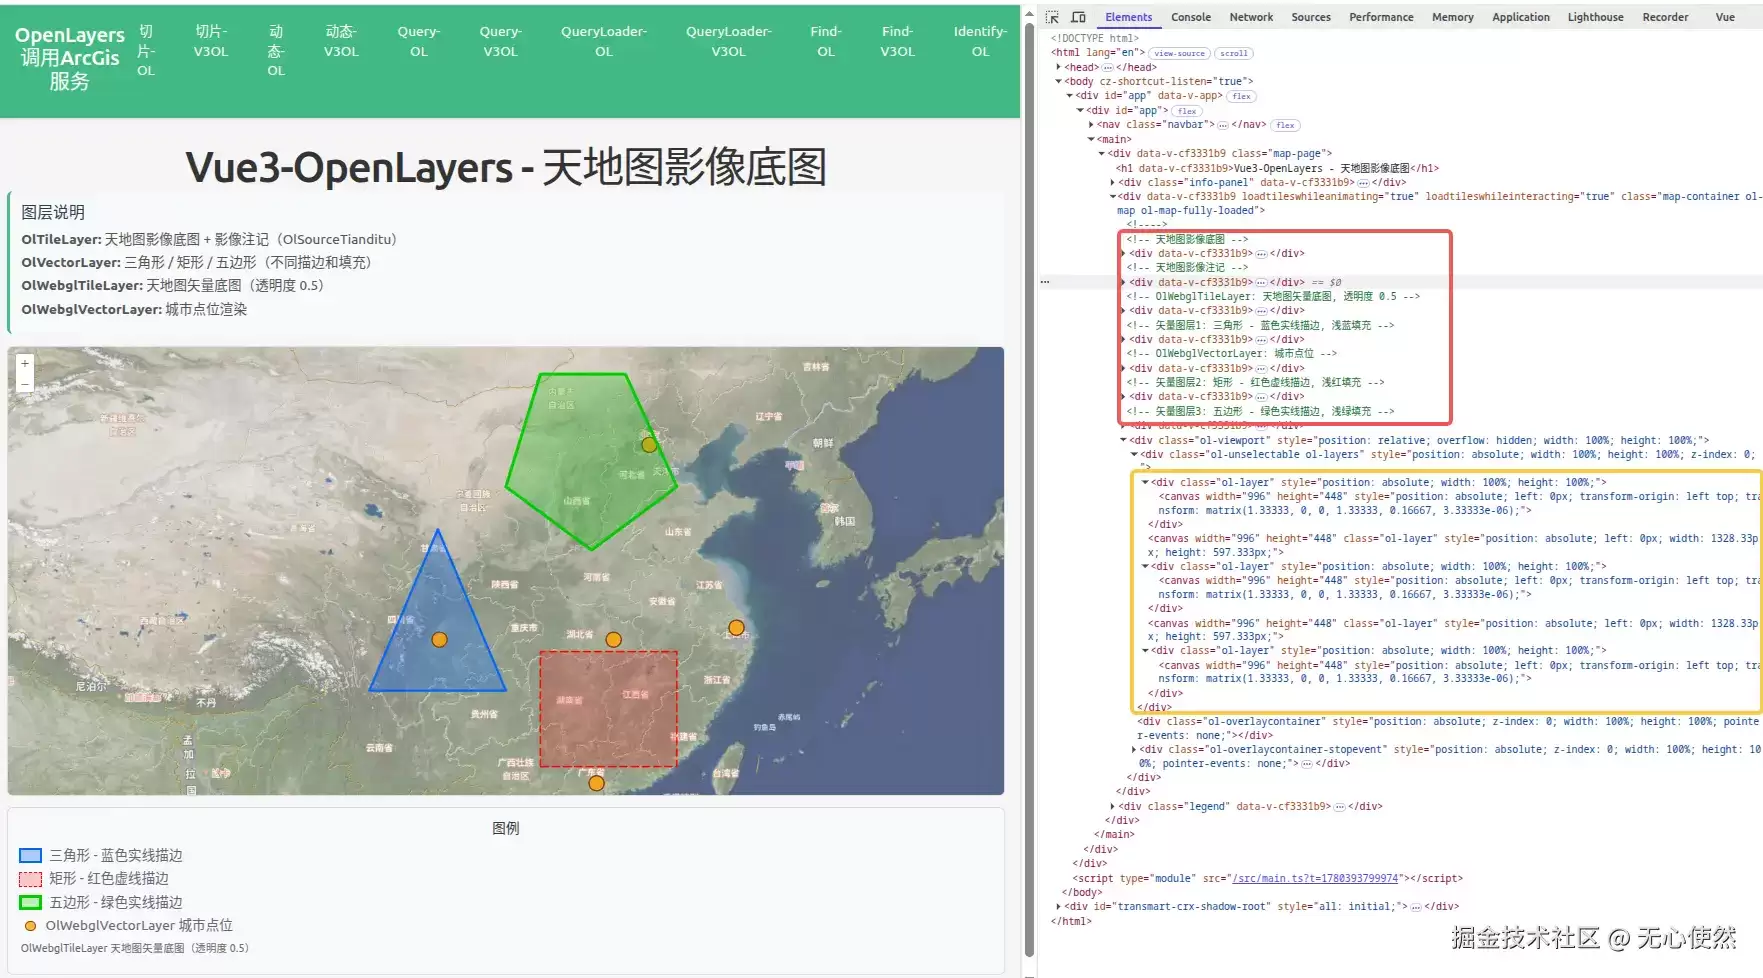
 结合下面的代码可以发现:
- tiandituImgLayer,tiandituCiaLayer,类名都是ol-layer,被合并渲染到了红色框内的canvas中
- webglTileLayer,类名是ol-layer,被渲染到了橙色框内的canvas中
- vectorLayer1,类名是ol-layer,被渲染到了绿色框内的canvas中
- webglVectorLayer,类名是ol-layer,被渲染到了蓝色框内的canvas中
- vectorLayer2,vectorLayer3,类名是ol-layer,被渲染到了黑色框内的canvas中
5.2.2.2 关键代码
// 省略上方代码
onMounted(() => {
  map = new Map({
    target: mapContainer.value!,
    layers: [
      tiandituImgLayer,
      tiandituCiaLayer,
      webglTileLayer,
      vectorLayer1,
      webglVectorLayer,
      vectorLayer2,
      vectorLayer3,
    ],
    view: new View({
      center: fromLonLat([108, 34]),
      zoom: 5,
    }),
  });
});
// 省略下方代码
5.2.3 为图层设置CSS动画
5.2.3.1 渲染结果
5.2.3.2 关键代码
// 省略上方代码
// ===== 天地图影像底图 =====
const tiandituImgLayer = new TileLayer({
  source: new XYZ({
    url: `https://t{0-7}.tianditu.gov.cn/DataServer?T=img_w&x={x}&y={y}&l={z}&tk=${TK}`,
  }),
  className: "layer1",
});// 天地图影像注记层
const tiandituCiaLayer = new TileLayer({
  source: new XYZ({
    url: `https://t{0-7}.tianditu.gov.cn/DataServer?T=cia_w&x={x}&y={y}&l={z}&tk=${TK}`,
  }),
  className: "layer1",
});// 省略中间代码
<style scoped>// 省略上方代码
:deep(.layer1) {
  animation: fadeIn 2s ease-in infinite;
}@keyframes fadeIn {
  from {
    opacity: 1;
  }
  to {
    opacity: 0;
  }
}
</style>
6 对比(Vue3-Openlayers版本)
6.1 默认合成渲染
6.1.1 渲染结果
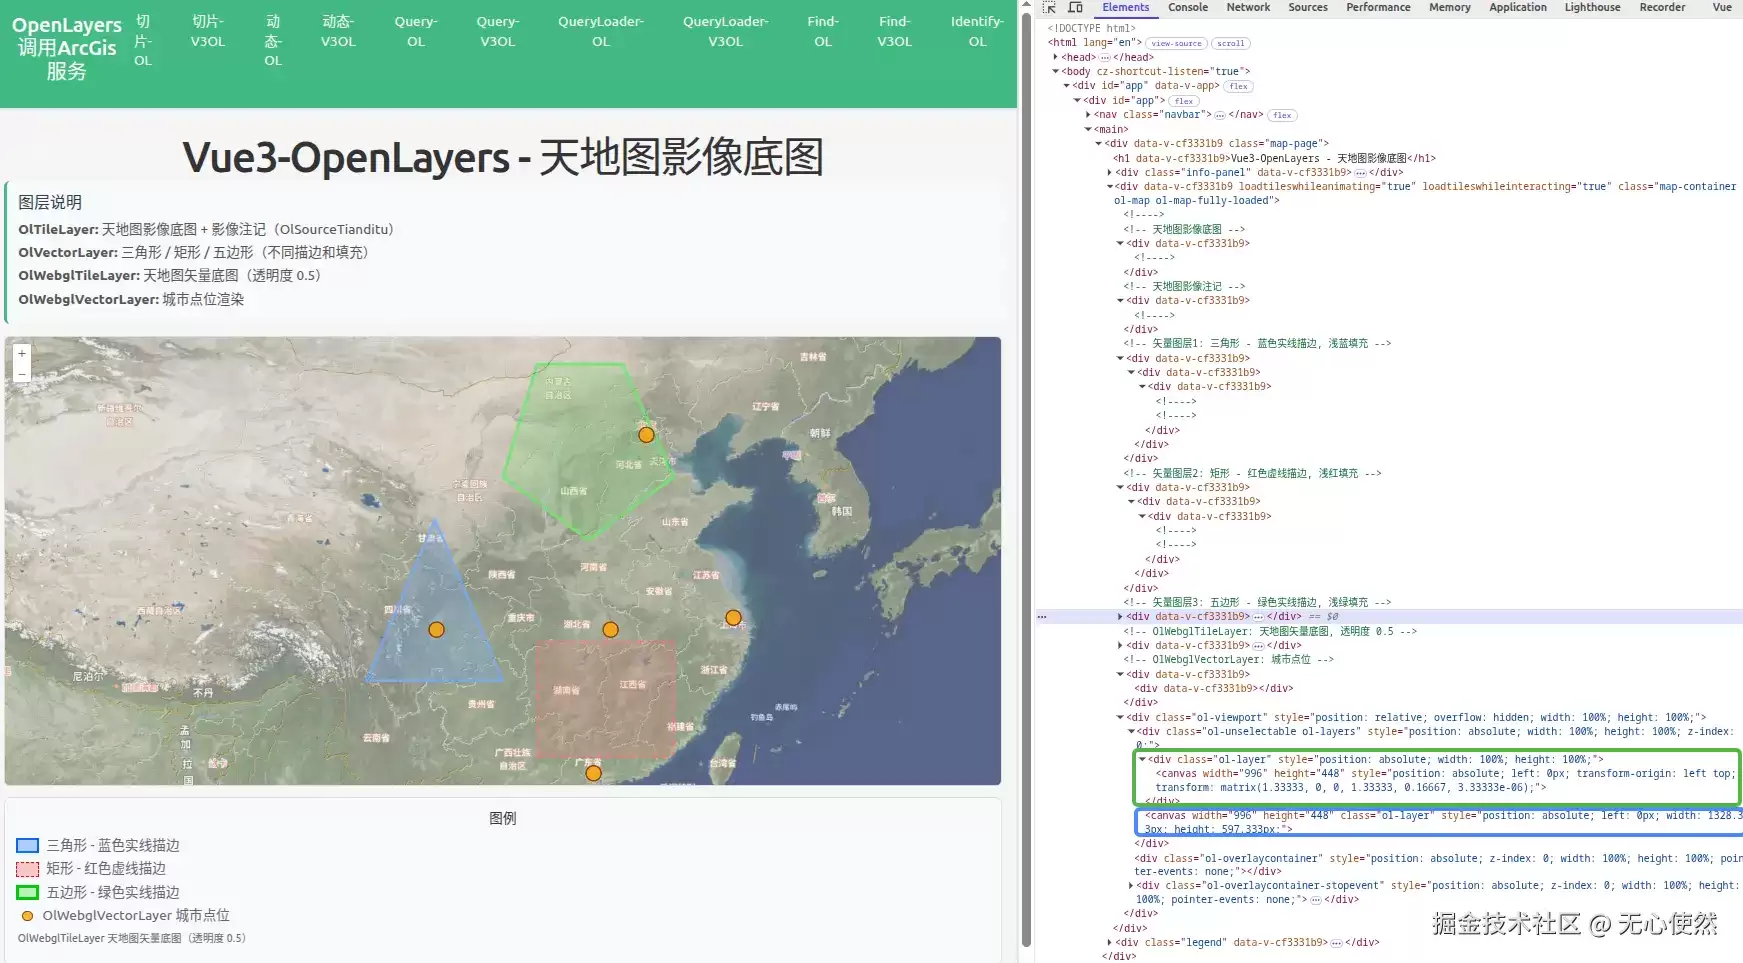 结合下面的代码可以发现:
- tiandituImgLayer,tiandituCiaLayer,vectorLayer1,vectorLayer2,vectorLayer3被合并渲染到了绿色框内的canvas中
- webglTileLayer,webglVectorLayer被合并渲染到了蓝色框内的canvas中
而且可以发现,使用Vue3-Openlayers后,会创建很多空div,高度均为0
6.1.2 代码
<template>
  <div class="map-page">
    <h1>Vue3-OpenLayers - 天地图影像底图</h1>
    <div class="info-panel">
      <h3>图层说明</h3>
      <p>
        <strong>OlTileLayer:</strong> 天地图影像底图 +
        影像注记(OlSourceTianditu)
      </p>
      <p>
        <strong>OlVectorLayer:</strong> 三角形 / 矩形 / 五边形(不同描边和填充)
      </p>
      <p><strong>OlWebglTileLayer:</strong> 天地图矢量底图(透明度 0.5)</p>
      <p><strong>OlWebglVectorLayer:</strong> 城市点位渲染</p>
    </div>
    <ol-map
      ref="mapRef"
      :loadTilesWhileAnimating="true"
      :loadTilesWhileInteracting="true"
      class="map-container"
    >
      <ol-view :center="center" :zoom="zoom" projection="EPSG:3857" />      <!-- 天地图影像底图 -->
      <ol-tile-layer>
        <ol-source-tianditu layerType="img" :tk="tk" />
      </ol-tile-layer>      <!-- 天地图影像注记 -->
      <ol-tile-layer>
        <ol-source-tianditu layerType="img" :tk="tk" :isLabel="true" />
      </ol-tile-layer>      <!-- 矢量图层1: 三角形 - 蓝色实线描边, 浅蓝填充 -->
      <ol-vector-layer>
        <ol-source-vector ref="triangleSourceRef">
          <ol-style>
            <ol-style-stroke color="#0066FF" :width="3" />
            <ol-style-fill color="rgba(0, 102, 255, 0.3)" />
          </ol-style>
        </ol-source-vector>
      </ol-vector-layer>      <!-- 矢量图层2: 矩形 - 红色虚线描边, 浅红填充 -->
      <ol-vector-layer>
        <ol-source-vector ref="rectSourceRef">
          <ol-style>
            <ol-style-stroke color="#FF0000" :width="2" :lineDash="[10, 5]" />
            <ol-style-fill color="rgba(255, 0, 0, 0.2)" />
          </ol-style>
        </ol-source-vector>
      </ol-vector-layer>      <!-- 矢量图层3: 五边形 - 绿色实线描边, 浅绿填充 -->
      <ol-vector-layer>
        <ol-source-vector ref="pentagonSourceRef">
          <ol-style>
            <ol-style-stroke color="#00CC00" :width="4" />
            <ol-style-fill color="rgba(0, 204, 0, 0.25)" />
          </ol-style>
        </ol-source-vector>
      </ol-vector-layer>      <!-- OlWebglTileLayer: 天地图矢量底图, 透明度 0.5 -->
      <ol-webgl-tile-layer :opacity="0.5">
        <ol-source-xyz :url="vecUrl" />
      </ol-webgl-tile-layer>      <!-- OlWebglVectorLayer: 城市点位 -->
      <ol-webgl-vector-layer :styles="webglVectorStyles">
        <ol-source-vector ref="webglVectorSourceRef" />
      </ol-webgl-vector-layer>
    </ol-map>
    <div class="legend">
      <h4>图例</h4>
      <div class="legend-item">
        <span
          class="legend-color"
          style="
            background-color: rgba(0, 102, 255, 0.3);
            border: 3px solid #0066ff;
          "
        ></span>
        <span>三角形 - 蓝色实线描边</span>
      </div>
      <div class="legend-item">
        <span
          class="legend-color"
          style="
            background-color: rgba(255, 0, 0, 0.2);
            border: 2px dashed #ff0000;
          "
        ></span>
        <span>矩形 - 红色虚线描边</span>
      </div>
      <div class="legend-item">
        <span
          class="legend-color"
          style="
            background-color: rgba(0, 204, 0, 0.25);
            border: 4px solid #00cc00;
          "
        ></span>
        <span>五边形 - 绿色实线描边</span>
      </div>
      <div class="legend-item">
        <span
          class="legend-dot"
          style="background-color: rgba(255, 165, 0, 0.8)"
        ></span>
        <span>OlWebglVectorLayer 城市点位</span>
      </div>
      <div class="legend-item">
        <span class="legend-label"
          >OlWebglTileLayer 天地图矢量底图(透明度 0.5)</span
        >
      </div>
    </div>
  </div>
</template><script setup lang="ts">
import { onMounted, ref } from "vue";
import { fromLonLat } from "ol/proj";
import { Polygon, Point } from "ol/geom";
import Feature from "ol/Feature";// 天地图 Token(请替换为自己的 Token)
const tk = "";const center = ref(fromLonLat([108, 34]));
const zoom = ref(5);const vecUrl = `https://t{0-7}.tianditu.gov.cn/DataServer?T=vec_w&x={x}&y={y}&l={z}&tk=${tk}`;// WebGLVector 扁平样式(flat style)
const webglVectorStyles = {
  "circle-radius": 10,
  "circle-fill-color": "rgba(255, 165, 0, 0.8)",
  "circle-stroke-color": "#8B4513",
  "circle-stroke-width": 2,
};// Source 引用
const triangleSourceRef = ref();
const rectSourceRef = ref();
const pentagonSourceRef = ref();
const webglVectorSourceRef = ref();onMounted(() => {
  // 三角形
  const triSource = triangleSourceRef.value?.source;
  if (triSource) {
    triSource.addFeature(
      new Feature({
        geometry: new Polygon([
          [
            fromLonLat([100, 28]),
            fromLonLat([108, 28]),
            fromLonLat([104, 36]),
            fromLonLat([100, 28]),
          ],
        ]),
      }),
    );
  }  // 矩形
  const rectSource = rectSourceRef.value?.source;
  if (rectSource) {
    rectSource.addFeature(
      new Feature({
        geometry: new Polygon([
          [
            fromLonLat([110, 24]),
            fromLonLat([118, 24]),
            fromLonLat([118, 30]),
            fromLonLat([110, 30]),
            fromLonLat([110, 24]),
          ],
        ]),
      }),
    );
  }  // 五边形
  const pentSource = pentagonSourceRef.value?.source;
  if (pentSource) {
    pentSource.addFeature(
      new Feature({
        geometry: new Polygon([
          [
            fromLonLat([108, 38]),
            fromLonLat([113, 35]),
            fromLonLat([118, 38]),
            fromLonLat([115, 43]),
            fromLonLat([110, 43]),
            fromLonLat([108, 38]),
          ],
        ]),
      }),
    );
  }  // WebGLVector 城市点位
  const wvSource = webglVectorSourceRef.value?.source;
  if (wvSource) {
    wvSource.addFeatures([
      new Feature({ geometry: new Point(fromLonLat([116.4, 39.9])) }),
      new Feature({ geometry: new Point(fromLonLat([121.5, 31.2])) }),
      new Feature({ geometry: new Point(fromLonLat([113.3, 23.1])) }),
      new Feature({ geometry: new Point(fromLonLat([104.1, 30.6])) }),
      new Feature({ geometry: new Point(fromLonLat([114.3, 30.6])) }),
    ]);
  }
});
</script><style scoped>
.map-page {
  padding: 20px;
}h1 {
  margin-bottom: 20px;
  color: #333;
}.info-panel {
  background-color: #f8f9fa;
  padding: 15px;
  border-radius: 8px;
  margin-bottom: 15px;
  border-left: 4px solid #42b983;
  text-align: left;
}.info-panel h3 {
  margin-top: 0;
  margin-bottom: 10px;
  color: #2c3e50;
}.info-panel p {
  margin: 5px 0;
  color: #555;
}.map-container {
  width: 100%;
  height: 600px;
  border: 2px solid #ddd;
  border-radius: 8px;
  overflow: hidden;
}.legend {
  margin-top: 15px;
  padding: 15px;
  background-color: #f8f9fa;
  border-radius: 8px;
  border: 1px solid #ddd;
}.legend h4 {
  margin-top: 0;
  margin-bottom: 10px;
  color: #333;
}.legend-item {
  display: flex;
  align-items: center;
  margin: 5px 0;
}.legend-color {
  width: 30px;
  height: 20px;
  margin-right: 10px;
  display: inline-block;
}.legend-dot {
  width: 14px;
  height: 14px;
  border-radius: 50%;
  margin-right: 13px;
  margin-left: 8px;
  border: 2px solid #8b4513;
  display: inline-block;
}.legend-label {
  font-size: 14px;
  color: #666;
  margin-left: 2px;
}
</style>
6.2 按需分层渲染
6.2.1 设置类名和背景色
6.2.1.1 渲染结果
6.2.2.1 关键代码
与原生写法一样,只需要在组件上绑定className类名和background背景色即可达到效果
 // 省略上方代码
<!-- 天地图影像底图 -->
      <ol-tile-layer className="layer1">
        <ol-source-tianditu layerType="img" :tk="tk" />
      </ol-tile-layer>      <!-- 天地图影像注记 -->
      <ol-tile-layer className="layer1">
        <ol-source-tianditu layerType="img" :tk="tk" :isLabel="true" />
      </ol-tile-layer>      <!-- 矢量图层1: 三角形 - 蓝色实线描边, 浅蓝填充 -->
      <ol-vector-layer className="layer2">
        <ol-source-vector ref="triangleSourceRef">
          <ol-style>
            <ol-style-stroke color="#0066FF" :width="3" />
            <ol-style-fill color="rgba(0, 102, 255, 0.3)" />
          </ol-style>
        </ol-source-vector>
      </ol-vector-layer>      <!-- 矢量图层2: 矩形 - 红色虚线描边, 浅红填充 -->
      <ol-vector-layer className="layer3">
        <ol-source-vector ref="rectSourceRef">
          <ol-style>
            <ol-style-stroke color="#FF0000" :width="2" :lineDash="[10, 5]" />
            <ol-style-fill color="rgba(255, 0, 0, 0.2)" />
          </ol-style>
        </ol-source-vector>
      </ol-vector-layer>      <!-- 矢量图层3: 五边形 - 绿色实线描边, 浅绿填充 -->
      <ol-vector-layer className="layer3" background="rgba(0,0,0,0.5)">
        <ol-source-vector ref="pentagonSourceRef">
          <ol-style>
            <ol-style-stroke color="#00CC00" :width="4" />
            <ol-style-fill color="rgba(0, 204, 0, 0.25)" />
          </ol-style>
        </ol-source-vector>
      </ol-vector-layer>      <!-- OlWebglTileLayer: 天地图矢量底图, 透明度 0.5 -->
      <ol-webgl-tile-layer :opacity="0.5" className="layer4">
        <ol-source-xyz :url="vecUrl" />
      </ol-webgl-tile-layer>      <!-- OlWebglVectorLayer: 城市点位 -->
      <ol-webgl-vector-layer :styles="webglVectorStyles" className="layer5">
        <ol-source-vector ref="webglVectorSourceRef" />
      </ol-webgl-vector-layer>
 // 省略下方代码
6.2.2 设置加入地图的顺序
6.2.2.1 渲染结果
6.2.2.1 关键代码
只需要调整组件顺序即可
      // 省略上方代码
     <!-- 天地图影像底图 -->
      <ol-tile-layer>
        <ol-source-tianditu layerType="img" :tk="tk" />
      </ol-tile-layer>      <!-- 天地图影像注记 -->
      <ol-tile-layer>
        <ol-source-tianditu layerType="img" :tk="tk" :isLabel="true" />
      </ol-tile-layer>      <!-- OlWebglTileLayer: 天地图矢量底图, 透明度 0.5 -->
      <ol-webgl-tile-layer :opacity="0.5">
        <ol-source-xyz :url="vecUrl" />
      </ol-webgl-tile-layer>      <!-- 矢量图层1: 三角形 - 蓝色实线描边, 浅蓝填充 -->
      <ol-vector-layer>
        <ol-source-vector ref="triangleSourceRef">
          <ol-style>
            <ol-style-stroke color="#0066FF" :width="3" />
            <ol-style-fill color="rgba(0, 102, 255, 0.3)" />
          </ol-style>
        </ol-source-vector>
      </ol-vector-layer>      <!-- OlWebglVectorLayer: 城市点位 -->
      <ol-webgl-vector-layer :styles="webglVectorStyles">
        <ol-source-vector ref="webglVectorSourceRef" />
      </ol-webgl-vector-layer>      <!-- 矢量图层2: 矩形 - 红色虚线描边, 浅红填充 -->
      <ol-vector-layer>
        <ol-source-vector ref="rectSourceRef">
          <ol-style>
            <ol-style-stroke color="#FF0000" :width="2" :lineDash="[10, 5]" />
            <ol-style-fill color="rgba(255, 0, 0, 0.2)" />
          </ol-style>
        </ol-source-vector>
      </ol-vector-layer>      <!-- 矢量图层3: 五边形 - 绿色实线描边, 浅绿填充 -->
      <ol-vector-layer>
        <ol-source-vector ref="pentagonSourceRef">
          <ol-style>
            <ol-style-stroke color="#00CC00" :width="4" />
            <ol-style-fill color="rgba(0, 204, 0, 0.25)" />
          </ol-style>
        </ol-source-vector>
      </ol-vector-layer>
      // 省略下方代码