Linux通过Rsync+Sersync实现文件实时同步
作者:袖梨
2026-07-23
项目实战:Rsync + Sersync 实现文件实时同步
客户端中数据发生变化,同步到server端(备份服务器)。
Rsync:负责数据同步,部署在server端。
Sersync:负责监控数据目录变化,并调用rsync进行同步,部署在client端。
部署 Rsync 服务
安装软件包
[root@server ~ 10:02:17]# yum install -y rsync
配置 rsync
本次实验使用验证用户同步。
# 准备同步目录,该目录任何用户都可以读写。[root@server ~ 10:10:24]# mkdir -m 777 /backup# 配置rsync,不验证用户,直接同步[root@server ~ 10:10:45]# vim /etc/rsyncd.conf.....# 添加如下配置[backup]# 描述信息comment = backup# 备份路径path = /backup# 设置可写read only = no# 指定用户名auth users = rsync# 指定用户密码文件secrets file = /etc/rsyncd.secrets# 创建用户凭据文件[root@server ~ 10:12:08]# echo 'rsync:123' > /etc/rsyncd.secrets[root@server ~ 10:13:38]# chmod 400 /etc/rsyncd.secrets# 启用并启动rsyncd服务[root@server ~ 10:14:28]# systemctl enable rsyncd --nowCreated symlink from /etc/systemd/system/multi-user.target.wants/rsyncd.service to /usr/lib/systemd/system/rsyncd.service.# 配置防火墙[root@server ~ 10:15:10]# firewall-cmd --add-service=rsyncdsuccess[root@server ~ 10:16:03]# firewall-cmd --add-service=rsyncd --permanentsuccess
更多 rsyncd.conf 配置参考 rsyncd.conf(5)。
客户端配置和测试
# 准备密码文件[root@client ~ 09:21:16]# echo 123 > rsyncd.secrets[root@client ~ 10:22:39]# chmod 400 rsyncd.secrets# 传输测试[root@client ~ 10:38:31]# rsync -av --password-file=./rsyncd.secrets /etc/hostname rsync@server::backupsending incremental file listsent 46 bytes received 12 bytes 116.00 bytes/sectotal size is 16 speedup is 0.28# 验证结果[root@server ~ 10:36:07]# ls /backup/hostname
部署 Sersync 服务
Sersync 服务介绍
sersync 使用c++编写,类似于inotify,同样用于监控,但它克服了inotify的缺点。
inotify 最大的不足是会产生重复事件,或者同一个目录下多个文件的操作会产生多个事件,例如,当监控目录中有5个文件时,删除目录时会产生6个监控事件,从而导致重复调用rsync命令。比如:vim文件时,inotify会监控到临时文件的事件,但这些事件相对于rsync来说是不应该被监控的。
sersync 优点:
- sersync 同步效率更高,它会对linux系统文件系统产生的临时文件和重复的文件操作进行过滤,节省了运行时耗和网络资源。
- sersync配置很简单,其中提供了静态编译好的二进制文件和xml配置文件,直接使用即可。
- sersync使用多线程进行同步,尤其在同步较大文件时,能够保证多个服务器实时保持同步状态。
- sersync有出错处理机制,通过失败队列对出错的文件重新同步,如果仍旧失败,则按设定时长对同步失败的文件重新同步。
- sersync自带crontab功能,只需在xml配置文件中开启,按要求隔一段时间整体同步一次。
- sersync 可以二次开发。
sersync项目地址:https://code.google.com/archive/p/sersync/
sersync下载地址:https://code.google.com/archive/p/sersync/downloads
安装软件包
# 下载软件[root@client ~ 10:54:54]# wget https://storage.googleapis.com/google-code-archive-downloads/v2/code.google.com/sersync/sersync2.5.4_64bit_binary_stable_final.tar.gz# 解压文件[root@client ~ 11:05:09]# tar -xf sersync2.5.4_64bit_binary_stable_final.tar.gz[root@client ~ 11:05:30]# ls GNU-Linux-x86/confxml.xml sersync2
文件说明:
- sersync2,是二进制程序。
- confxml.xml,是sersync2程序的配置文件。
配置 Sersync
配置文件说明
[root@client ~ 11:06:08]# cat GNU-Linux-x86/confxml.xml
<?xml version="1.0" encoding="ISO-8859-1"?><head version="2.5"> <!-- hostip与port是针对插件的保留字段,对于同步功能没有任何作用,保留默认即可。 --> <host hostip="localhost" port="8008"></host> <!-- 是否开启debug模式 --> <debug start="false"/> <!-- 如果是xfs文件系统,则需要设置为true才能同步,rehat/REEL/CentOS/Fedora新版本默认都是xfs文件系统,可使用df -Th命令查看 --> <fileSystem xfs="true"/> <!-- 过滤器,设置为true则会对里面的exclude对应的正则匹配到的文件进行过滤,即不同步 --> <filter start="true"> <!-- <exclude expression="(.*).svn"></exclude> --> <!-- <exclude expression="(.*).gz"></exclude> --> <!-- <exclude expression="^info/*"></exclude> --> <!-- <exclude expression="^static/*"></exclude> --> <exclude expression="^cache/*"></exclude> </filter> <!-- inotify是linux的内核功能,这里用于设置创建/删除/修改/移动文件时,是否视为文件改变(进而进行同步) --> <inotify> <!-- 删除一个文件是否视为文件改变(很明显我们要设置为true) --> <delete start="false"/> <!-- 创建一个文件夹是否视为文件改变(很明显我们要设置为true) --> <createFolder start="true"/> <!-- 创建一个文件是否触发文件改变事件(这里要设置false,因为创建一个文件除了有createFile事件还会有closeWrite事件,我们只要把closeWrite事件设置为true即可监控到创建 一个文件) --> <createFile start="false"/> <!-- 创建文件或修改文件后再关闭会触发该事件,比如vim打开一个文件,修改后用(:wq)保存,则会触发该事件,当然创建新文件一样会触发 --> <closeWrite start="true"/> <!-- 从别的地方移到被监控目录是否视为文件改变,毫无疑问要设置为true --> <moveFrom start="true"/> <!-- 被监控目录中的某个文件被移动到其他地方算不算文件改变?毫无疑问要设置为true --> <moveTo start="true"/> <!-- 文件属性改变了,是否视为文件改变?这个我们可以认为文件没有改,所以设置false --> <attrib start="false"/> <!-- 文件内容被修改了是否视为文件改变?感觉文件改变肯定要设置为true,但其实不用,因为这个改变有可能是vim(:w)保存,还没有关闭文件,所以保存的时候没必要同步,而关闭的时候会触发closeWrite,所以修改的文件也是通过closeWrite来同步的 --> <modify start="false"/> </inotify> <!-- servsync的模块 --> <sersync> <!-- 指定要监控(即同步)的本地目录 --> <localpath watch="/data"> <!-- ip指定同步到远程的哪个服务器,name填写远程服务器中rsync配置文件中的自定义模块名称(即中括号括起来的那个名称) --> <remote ip="10.1.8.10" name="laoma"/> <!-- 如果你要同步到多台服务器,继续填写即可,每个服务器一个remote标签 --> <!--<remote ip="192.168.8.40" name="tongbu"/>--> </localpath> <!-- rsync模块配置 --> <rsync> <!-- 公共参数,即我们手动执行rsync的时候要带的选项就填在这里,servsync会自动组装 --> <commonParams params="-azP"/> <!-- 密码文件及指定用户名(用户名就是rsync服务器端配置文件中的"auth user =" 指定的用户名) --> <auth start="true" users="rsync" passwordfile="/etc/rsyncd.secrets"/> <!-- 如果你rsync服务器不是默认端口873,那么就要在这里指定具体的端口,当然是默认的你也可以指定一下 --> <userDefinedPort start="false" port="873"/> <!-- rsync超时时间 --> <timeout start="false" time="100"/><!-- timeout=100 --> <!-- 是否使用ssh方式传输 --> <ssh start="false"/> </rsync> <!-- 对于失败的传输,会进行重新传送,再次失败就会写入rsync_fail_log,然后每隔一段时间(timeToExecute进行设置,单位sec)执行该脚本再次重新传送,然后清空该脚本。可以 通过path来设置日志路径。 --> <failLog path="/tmp/rsync_fail_log.sh" timeToExecute="60"/><!--default every 60mins execute once--> <!-- 定期整体同步功能,schedule表示crontab执行间隔,单位是min --> <crontab start="false" schedule="600"><!--600mins--> <!-- 同步过滤器,要开启请把start设置为true,用于 整体同步时,排除一些文件或目录,比如缓存目录可以不需要同步 --> <crontabfilter start="false"> <exclude expression="*.php"></exclude> <exclude expression="info/*"></exclude> </crontabfilter> </crontab> <!-- 同步完成后,执行一个插件,name表示执行哪些插件,而这个插件必须在后边用plugin标签定义 --> <plugin start="false" name="command"/> </sersync> <!-- 定义一个command插件(command插件类型的一种,另外的类型有socket,refreshCDN,http(目前由于兼容性问题,http插件暂时不能用)) --> <plugin name="command"> <!-- command插件其实就是“.sh”结尾的shell脚本文件,prefix和subffix用于拼成一条执行shell命令的命令 --> <param prefix="/bin/sh" suffix="" ignoreError="true"/> <!--prefix /data/wwwroot/mmm.sh suffix--> <!-- 该脚本做操作时要过滤的文件正则 --> <filter start="false"> <include expression="(.*).php"/> <include expression="(.*).sh"/> </filter> </plugin> <!-- 定义一个socket插件,注意插件定义了但没有调用的话,是不会被执行的 --> <plugin name="socket"> <localpath watch="/data"> <deshost ip="192.168.138.20" port="8009"/> </localpath> </plugin> <!-- 定义一个refreshCDN插件,主要用于同步数据到cdn --> <plugin name="refreshCDN"> <localpath watch="/data0/htdocs/cms.xoyo.com/site/"> <cdninfo domainname="ccms.chinacache.com" port="80" username="xxxx" passwd="xxxx"/> <sendurl base="http://pic.xoyo.com/cms"/> <regexurl regex="false" match="cms.xoyo.com/site([/a-zA-Z0-9]*).xoyo.com/images"/> </localpath> </plugin></head>
配置文件示例
本次实验使用的示例文件。
[root@client ~ 11:25:56]# vim confxml.xml
<?xml version="1.0" encoding="ISO-8859-1"?><head version="2.5"> <host hostip="localhost" port="8008"></host> <debug start="false"/> <fileSystem xfs="true"/> <filter start="true"> <exclude expression="^cache/*"></exclude> </filter> <inotify> <delete start="true"/> <createFolder start="true"/> <createFile start="false"/> <closeWrite start="true"/> <moveFrom start="true"/> <moveTo start="true"/> <attrib start="false"/> <modify start="false"/> </inotify> <sersync> <localpath watch="/app_data"> <remote ip="10.1.8.10" name="backup"/> </localpath> <rsync> <commonParams params="-azP"/> <auth start="true" users="rsync" passwordfile="/root/rsyncd.secrets"/> <userDefinedPort start="false" port="873"/> <timeout start="false" time="100"/> <ssh start="false"/> </rsync> <failLog path="/tmp/rsync_fail_log.sh" timeToExecute="60"/> <crontab start="false" schedule="600"><!--600mins--> <crontabfilter start="false"> <exclude expression="*.php"></exclude> <exclude expression="info/*"></exclude> </crontabfilter> </crontab> <plugin start="false" name="command"/> </sersync> <plugin name="command"> <param prefix="/bin/sh" suffix="" ignoreError="true"/> <filter start="false"> <include expression="(.*).php"/> <include expression="(.*).sh"/> </filter> </plugin></head>
运行 Sersync
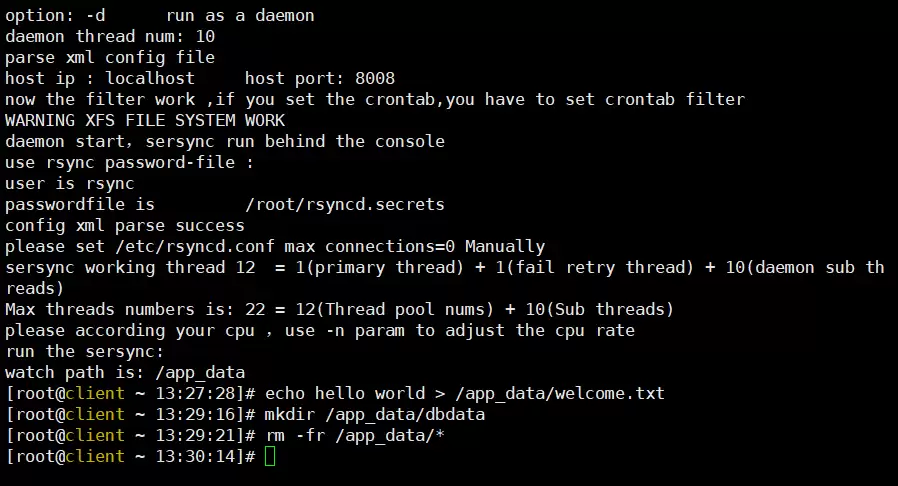
# 准备同步目录[root@client ~ 13:06:40]# mkdir /app_data# 复制程序到$PATH中[root@client ~ 13:07:54]# cp GNU-Linux-x86/sersync2 /usr/local/bin/[root@client ~ 13:08:31]# sersync2 -hset the system paramexecute:echo 50000000 > /proc/sys/fs/inotify/max_user_watchesexecute:echo 327679 > /proc/sys/fs/inotify/max_queued_eventsparse the command param_______________________________________________________参数-d:启用守护进程模式参数-r:在监控前,将监控目录与远程主机用rsync命令推送一遍c参数-n: 指定开启守护线程的数量,默认为10个参数-o:指定配置文件,默认使用confxml.xml文件参数-m:单独启用其他模块,使用 -m refreshCDN 开启刷新CDN模块参数-m:单独启用其他模块,使用 -m socket 开启socket模块参数-m:单独启用其他模块,使用 -m http 开启http模块不加-m参数,则默认执行同步程序________________________________________________________________# 运行 Sersync[root@client ~ 13:27:09]# sersync2 -o confxml.xml -dset the system paramexecute:echo 50000000 > /proc/sys/fs/inotify/max_user_watchesexecute:echo 327679 > /proc/sys/fs/inotify/max_queued_eventsparse the command paramoption: -o config xml name: confxml.xmloption: -d run as a daemondaemon thread num: 10parse xml config filehost ip : localhosthost port: 8008now the filter work ,if you set the crontab,you have to set crontab filter WARNING XFS FILE SYSTEM WORKdaemon start,sersync run behind the console use rsync password-file :user isrsyncpasswordfile is /root/rsyncd.secretsconfig xml parse successplease set /etc/rsyncd.conf max connections=0 Manuallysersync working thread 12 = 1(primary thread) + 1(fail retry thread) + 10(daemon sub threads) Max threads numbers is: 22 = 12(Thread pool nums) + 10(Sub threads)please according your cpu ,use -n param to adjust the cpu raterun the sersync: watch path is: /app_data
测试
# server 端监控目录 /backup[root@server ~ 13:28:16]# watch -n 1 ls /backup# 客户端创建文件和目录[root@client ~ 13:27:28]# echo hello world > /app_data/welcome.txt[root@client ~ 13:29:16]# mkdir /app_data/dbdata# 客户端删除文件[root@client ~ 13:29:21]# rm -fr /app_data/*
演示:
配置 systemd 管理 Sersync
[root@client ~ 13:31:35]# cp confxml.xml /etc/sersyncd.conf[root@client ~ 13:32:44]# vim /etc/systemd/system/sersyncd.service[Unit]Description=SerSync server daemon[Service]Type=forkingExecStart=/usr/local/bin/sersync2 -o /etc/sersyncd.conf -d[Install]WantedBy=multi-user.target[root@client ~ 13:33:32]# systemctl daemon-reload [root@client ~ 13:34:00]# systemctl enable sersyncd.serviceCreated symlink from /etc/systemd/system/multi-user.target.wants/sersyncd.service to /etc/systemd/system/sersyncd.service.
以上就是Linux使用Rsync+Sersync实现文件实时同步的详细内容,更多关于Linux Rsync+Sersync文件实时同步的资料请关注本站其它相关文章!
您可能感兴趣的文章:- 自动刷新从BrowserSync开始
- Linux下sersync数据实时同步
- sersync实现数据实时同步的方法
- Sersync+Rsync实现触发式文件同步实战过程