C#调用DeepSeek API的两种实现方式方案
平时做技术实践时,很多问题不是概念不会,而是细节没串起来。拿“C#调用DeepSeek API的两种实现方式方案”来说,它看着像小点,放到项目里常会牵出环境、配置、兼容性和维护成本。下面按实际使用顺序,把思路、关键写法和容易踩坑的地方讲清楚,方便你直接对照操作。
序
实际处理时,DeepSeek(深度求索) 最近可谓火爆的一塌糊涂,具体的介绍这里不再赘述,您可以各种搜索其信息,即使您不搜索,只要您拿起手机,各种关于 DeepSeek 的新闻、资讯也会扑面而来的推送到您面前。本人在闲暇之余也想了解一下其提供 API 的兼容能力,也想试验一下 “嵌入式” 的应用体验。
理解这一步时,打开官网,访问主页右上角的 API 开放平台,查看了一下 API 技术文档,果然不出所料,没有 C# 的调用示例,虽然语法调用都大同小异,但心中还是有些不爽,所以本文旨在提供相关的示例,仅供参考,希望对您有所帮助。根据目前的应用现状,本文提供了两种形式的调用方法:
1、原生官网 API 地址调用。
2、借助腾讯云知识引擎原子调用。(适合原生调用繁忙和失败的备用场景)
开发运行环境
操作系统: Windows Server 2019 DataCenter
.net版本: .netFramework4.7.2
开发工具:VS2019 C#
访问API的一个通用方法
结合项目来看,新建WebService类,该类的GetResponseResult 方法持续更新,主要根据 DeepSeek 对话补全的API文档,增加了HttpWebRequest.Accept 兼容,同时增加了 GET 访问请求的 WebRequest.Headrs 的兼容。
更新后的代码如下所示:
    public sealed class WebService
    {

        public string ErrorMessage = "";

        private static bool validSecurity(object sender, X509Certificate certificate, X509Chain chain, SslPolicyErrors sslPolicyErrors)
        {
            return true;
        }
        public string GetResponseResult(string url, System.Text.Encoding encoding, string method, string postData,string[] headers,string ContentType= "application/x-www-form-urlencoded",bool secValid=true)
        {
            method = method.ToUpper();
            if (secValid == false)
            {
                ServicePointManager.ServerCertificateValidationCallback = validSecurity;
            }
            System.Net.ServicePointManager.SecurityProtocol = System.Net.SecurityProtocolType.Tls | System.Net.SecurityProtocolType.Tls11 | System.Net.SecurityProtocolType.Tls12;

            if (method == "GET")
            {
                try
                {
                    WebRequest request2 = WebRequest.Create(@url);

                    request2.Method = method;
                    WebResponse response2 = request2.GetResponse();
                    if (headers != null)
                    {
                        for (int i = 0; i < headers.GetLength(0); i++)
                        {
                            if (headers[i].Split(':').Length < 2)
                            {
                                continue;
                            }

                            if (headers[i].Split(':').Length > 1)
                            {
                                if (headers[i].Split(':')[0] == "Content-Type")
                                {
                                    request2.ContentType = headers[i].Split(':')[1];
                                    continue;
                                }
                            }
                            request2.Headers.Add(headers[i]);
                        }
                    }

                    Stream stream = response2.GetResponseStream();
                    StreamReader reader = new StreamReader(stream, encoding);
                    string content2 = reader.ReadToEnd();
                    return content2;
                }
                catch (Exception ex)
                {
                    ErrorMessage = ex.Message;
                    return "";
                }

            }
            if (method == "POST")
            {

                Stream outstream = null;
                Stream instream = null;
                StreamReader sr = null;
                HttpWebResponse response = null;

                HttpWebRequest request = null;
                byte[] data = encoding.GetBytes(postData);
                // 准备请求...
                try
                {
                    // 设置参数
                    request = WebRequest.Create(url) as HttpWebRequest;
                    CookieContainer cookieContainer = new CookieContainer();
                    request.CookieContainer = cookieContainer;
                    request.AllowAutoRedirect = true;
                    request.Method = method;
                    request.Timeout = 1000000;
                    request.ContentType = ContentType;
                    if (headers != null)
                    {
                        for (int i = 0; i < headers.GetLength(0); i++)
                        {
                            if (headers[i].Split(':').Length < 2)
                            {
                                continue;
                            }

                            if (headers[i].Split(':').Length > 1)
                            {
                                if (headers[i].Split(':')[0] == "Host")
                                {
                                    request.Host = headers[i].Split(':')[1];
                                    continue;
                                }
                                else if (headers[i].Split(':')[0] == "Content-Type")
                                {
                                    request.ContentType = headers[i].Split(':')[1];
                                    continue;
                                }
                                else if (headers[i].Split(':')[0] == "Connection")
                                {
                                    request.KeepAlive = headers[i].Split(':')[1] == "close" ? false : true;
                                    continue;
                                }
                                else if (headers[i].Split(':')[0] == "Accept")
                                {
                                    request.Accept = headers[i].Split(':')[1];
                                    continue;
                                }

                            }
                            request.Headers.Add(headers[i]);
                        }
                    }
                    request.ContentLength = data.Length;
                    outstream = request.GetRequestStream();
                    outstream.Write(data, 0, data.Length);
                    outstream.Close();
                    //发送请求并获取相应回应数据
                    response = request.GetResponse() as HttpWebResponse;
                    //直到request.GetResponse()程序才开始向目标网页发送Post请求
                    instream = response.GetResponseStream();
                    sr = new StreamReader(instream, encoding);
                    //返回结果网页(html)代码
                    string content = sr.ReadToEnd();
                    sr.Close();
                    sr.Dispose();

                    return content;
                }
                catch (Exception ex)
                {
                    ErrorMessage = ex.Message;
                    return "";
                }
            }
            ErrorMessage = "不正确的方法类型。(目前仅支持GET/POST)";
            return "";

        }//get response result
}//class
具体的参数说明和更新的日志可访问文章:
C#采用融合通信API发送手机短信息_C#教程_脚本之家
C#实现访问Web API Url提交数据同时拿到处理结果_C#教程_脚本之家
原生官网实现
申请 API key
访问官网 DeepSeek,如下所示:
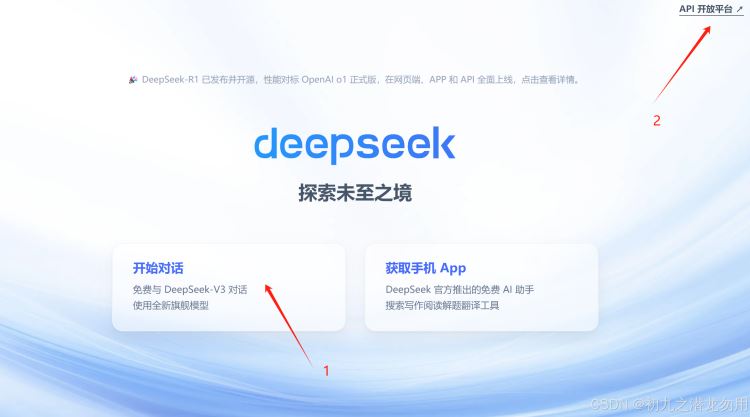
结合项目来看,如图采用您的手机号注册一个帐户,随后再点击右上角 “API 开放平台” 链接申请 API key。
点击如下所示图:
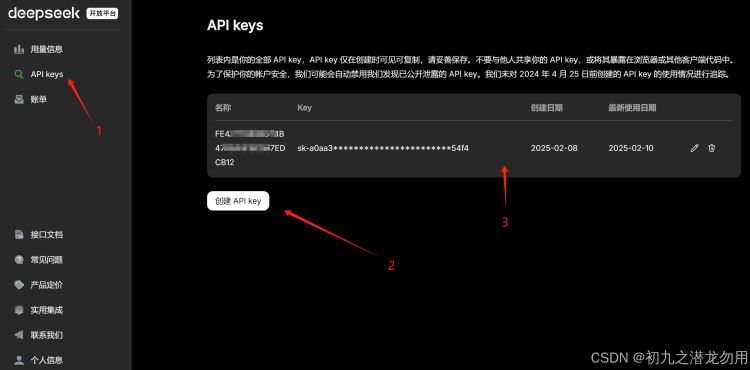
实际处理时,访问左侧 API keys 功能菜单,点击 “新建 API key” 按钮,按提示输入名称等点击确认即可生成 key 值,请务必妥善存储,这是调用 API 的关键认证信息值。
调用实现
新建 DeepSeek 类,类说明如下所示表:
| 序号 | 成员名称 | 成员类型 | 类型 | 说明 |
|---|---|---|---|---|
| 1 | ApiUrl | 属性 | string | 访问的API路径 |
| 2 | ApiKey | 属性 | string | 申请的 API key 值 |
| 3 | Model | 属性 | string | 采用的模型名称 |
| 4 | ErrorMessage | 属性 | string | 反馈的异常信息 |
| 5 | ResultJson | 属性 | string | 得到的JSON结果信息 |
| 6 | ch@t(string say) | 方法 | void | 调用原生对话API,参数为问题内容, 方法会写入 ErrorMessage和ResultJson属性值 |
| 7 | TC_ch@t(string say) | 方法 | void | 调用腾讯云封装对话API,参数为问题内容, 方法会写入 ErrorMessage和ResultJson属性值 |
类实现代码如下所示:
public class DeepSeek
    {
        public string ApiUrl { get; set; }
        public string ApiKey { get; set; }
        public string Model { get; set; }
        public string ErrorMessage = "";
        public string ResultJson = "";
        public DeepSeek(string apikey = "")
        {
            ApiKey = apikey;
        }
        public void ch@t(string say)
        {
            ApiUrl = "https://api.deepseek.com/ch@t/completions";
            Model = "deepseek-ch@t";
            WebService ws = new WebService();
            string[] headers = new string[3];
            headers[0] = "Content-Type:application/json";
            headers[1] = "Accept:application/json";
            headers[2] = "Authorization:Bearer " + ApiKey + "";

            var ReadyData = new
            {
                model = Model,
                messages = new[]{
                    new {role="user",content=say}
                }
            };
            string postData = Newtonsoft.Json.JsonConvert.SerializeObject(ReadyData);

            ErrorMessage = "";
            ResultJson = "";
            string rs = ws.GetResponseResult(ApiUrl, Encoding.UTF8, "POST", postData, headers);
            ErrorMessage = ws.ErrorMessage;
            ResultJson = rs;

        }
        public void TC_ch@t(string say)
        {
            ApiUrl = "https://api.lkeap.cloud.tencent.com/v1/ch@t/completions";
            Model = "deepseek-r1";
            WebService ws = new WebService();
            string[] headers = new string[3];
            headers[0] = "Content-Type:application/json";
            headers[1] = "Accept:application/json";
            headers[2] = "Authorization:Bearer " + ApiKey + "";

            var ReadyData = new
            {
                model = Model,
                messages = new[]{
                    new {role="user",content=say}
                }
            };
            string postData = Newtonsoft.Json.JsonConvert.SerializeObject(ReadyData);

            ErrorMessage = "";
            ResultJson = "";
            string rs = ws.GetResponseResult(ApiUrl, Encoding.UTF8, "POST", postData, headers);
            ErrorMessage = ws.ErrorMessage;
            ResultJson = rs;


        }

    }
调用示例
示例如下所示:
string ak = "";  //您申请的 API key

DeepSeek dp = new DeepSeek(ak);
dp.ch@t("你好!");
string debug = string.Format("ErrorMessage:{0}rnResultJson:{1}", dp.ErrorMessage, dp.ResultJson);
腾讯云知识引擎原子调用
申请 API key
访问产品官网 (链接已移除),登录成功如下所示:
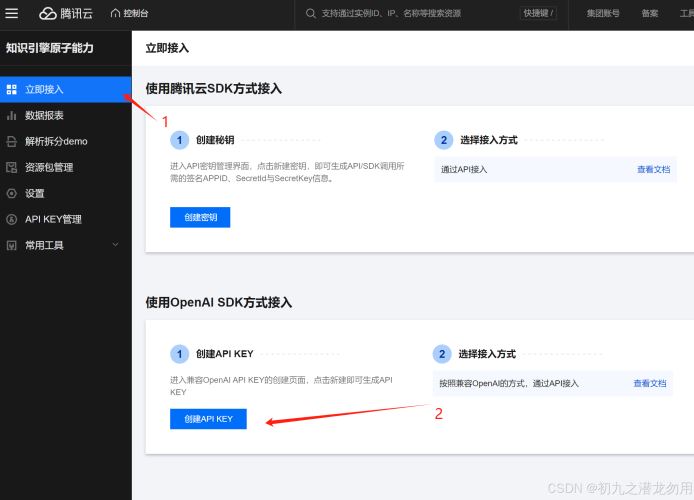
在这个场景下,如图选择左侧“立即接入”菜单功能,选择 采用 OpenAI SDK方式接入,点击“新建 API KEY”按钮,按提示操作即可新建,新建成功如下所示图:
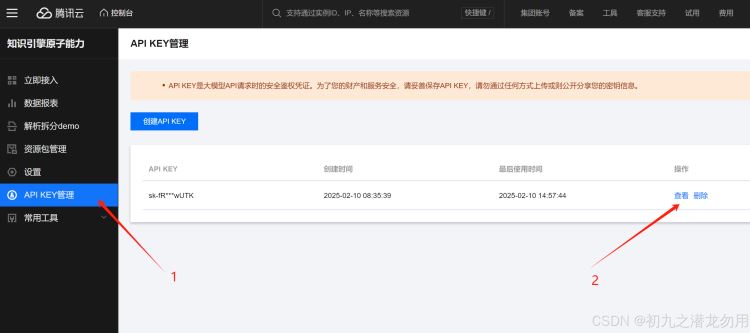
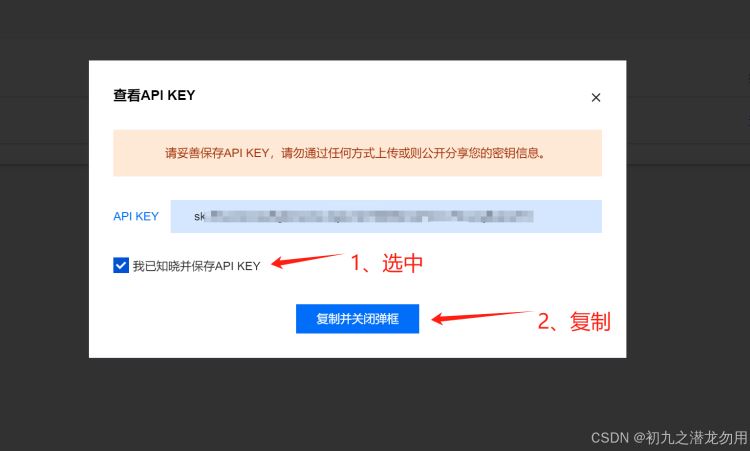
理解这一步时,如图选择“APK KEY 管理”,即可查看已经成功新建的 KEY 列表,点击“查看”链接可以复制键值,如下所示图中操作步骤。
调用示例
在原生实现章节中已经实现了方法调用编写,这里仅展示调用示例,代码如下所示:
string ak = "";  //您申请的 API key

DeepSeek dp = new DeepSeek(ak);
dp.TC_ch@t("你好!");
string debug = string.Format("ErrorMessage:{0}rnResultJson:{1}", dp.ErrorMessage, dp.ResultJson);
调用方法的区别在于调用了 TC_ch@t 方法,其它无需改变代码。
小结
从实现思路看,总的来说,C#调用DeepSeek API方案这部分内容适合结合实际项目边做边理解。先抓住核心思路,再逐步补上细节和边界处理,最后效果会更稳定,也更容易复用。