DeepSeek Harness入门、安装与自定义插件详细说明

DeepSeek Harness初体验:入门、安装与自定义插件
本文讲两件事:怎么装 DeepSeek Harness(
dsh),以及怎么写一个自定义插件(从极简到可用)。案例代码在tmp/cordis-tutorial/,三个案例全程无需 API key。
前提条件
阅读本文前,请确保已在仓库根目录完成以下操作(详见 1.2 节):
git clone https://github.com/deepseek-ai/deepseek-harness.gitcd deepseek-harnesspnpm installpnpm run build
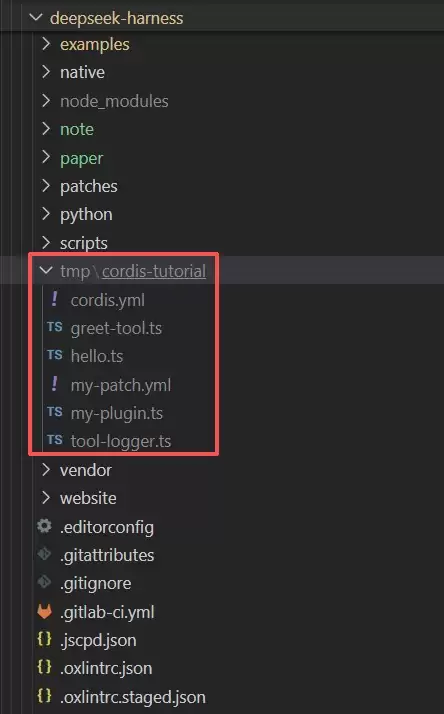
案例代码位于 tmp/cordis-tutorial/(tmp/ 被 .gitignore 忽略,不与原仓库冲突)。如果目录不存在:
mkdir -p tmp/cordis-tutorial
案例二、案例三依赖
pnpm run build生成的lib/产物(workspace 包如@deepseek-ai/dsh-tools需要构建产物)。如果还没 build,先 build 再继续。
1. 安装与介绍
1.1 快速安装(利用 Claude Code / Codex)
如果你正在用 Claude Code(cc)或 OpenAI Codex 这类 AI 编程助手,最快的方式是直接让它帮你装——这类工具能读官方文档、执行命令。只需说一句:
帮我安装 DeepSeek Harness:克隆 https://github.com/deepseek-ai/deepseek-harness.git,然后 pnpm install、pnpm run build,最后用 pnpm dsh web 启动验证。
它会自动完成「克隆 → 装依赖 → 构建 → 启动」。
如果你只想体验、不折腾源码,官方还提供一行命令直接启动 Web UI,无需 clone:
npx @deepseek-ai/dsh web # 默认 http://127.0.0.1:3080
1.2 从源码安装
git clone https://github.com/deepseek-ai/deepseek-harness.gitcd deepseek-harness#npm install -g pnpmpnpm install # 装依赖;要求 node ^22.19 或 >=24,没有 pnpm 先 npm install -g pnpmpnpm run build # 编译 workspace 包,生成 lib/(后面写工具插件、真正 boot 都要用)pnpm dsh web # 启动 Web UI(可选,本笔记的案例用不到)
两个实际踩过的坑:
- 本机一开始缺
pnpm,先npm install -g pnpm。 - 构建末尾报「chunk 大于 500 kB」的警告,可忽略,不影响运行。
1.3 简介:DeepSeek Harness 是什么
dsh 是 DeepSeek 开源的 agent harness(智能体框架)。模型本身只会输出文本,harness 负责让模型真正「干活」:调用工具、读写文件、跑 shell、出错重试、持久化对话等。
它的核心设计是:
一切皆插件(everything is a plugin)。 模型适配器、工具注册表、会话日志、乃至 agent 循环本身,全部是插件。没有需要你 patch 的特权核心——扩展它,就是挂一个插件到别人旁边。
它跑在 Cordis 这个 TypeScript 插件框架上(源码被拷贝进仓库的 vendor/,重命名到 @deepseek-ai scope)。写插件前,只需要搞懂下面 5 个概念,它们贯穿所有代码:
| 概念 | 一句话说明 |
|---|---|
| 插件 | 一个带 apply(ctx) 的函数,或 Service 子类。框架启动时调用 apply |
ctx(上下文) | 插件的唯一入口。每个能力占一个固定 key(ctx.tools、ctx.llm、ctx.sessions),插件通过它访问服务、注册自己的东西 |
inject(依赖注入) | 插件声明「我需要哪些服务」,框架等这些服务就绪才挂载它。加载顺序由依赖决定,不由配置顺序决定 |
| 事件 | 插件间通信。用 ctx.on('事件名', 回调) 订阅,用 emit / waterfall / parallel / serial 派发 |
| 可逆 effect | 一切注册走 ctx.effect() / ctx.on(),插件卸载时自动撤销 |
其中 inject 最关键:它回答了「这么多插件谁先谁后」——由服务依赖决定。
2. 如何自定义一个插件
2.1 极简插件(快速了解插件长什么样)
一个最简插件只有三样东西:
import type { Context } from '@deepseek-ai/cordis'export const name = 'hello'export function apply(ctx: Context) { console.log('hello from my first plugin')}逐行说明:
import type { Context }—— 只导入类型。type表示运行时会被删掉,纯粹为了类型提示。export const name = 'hello'—— 插件名,只用于诊断信息,可省略。export function apply(ctx)—— 插件的入口。框架启动时调用它,并把ctx传进来。这里只打印一句话,什么都没注册。
组合文件cordis.yml 告诉框架「启动时挂哪些插件」:
- name: './hello.ts'
运行(在 cordis.yml 所在目录,用教程自带的启动器):
cd tmp/cordis-tutorialnode --import tsx ../../vendor/cordis/bin.js
node --import tsx让 Node 能直接运行 TypeScript 文件(省去编译)。tsx包在仓库根目录的node_modules里,Node 从tmp/cordis-tutorial向上查找并找到它。启动器vendor/cordis/bin.js从当前目录读./cordis.yml,所以必须在cordis.yml所在目录运行这条命令。
输出:
hello from my first plugin
发生了什么:启动器创建根 Context → 挂载 Loader 插件 → Loader 读 cordis.yml 把 ./hello.ts 挂成子插件 → 调用你的 apply。注意你的插件里没有任何框架启动代码:行为在插件里,组合在配置里。
插件有三种形态,先用函数:
// 1. 函数插件(最常用)export function apply(ctx: Context) {}// 2. 对象插件export const objectPlugin = { name: 'x', apply(ctx: Context) {} }// 3. 类插件(想暴露服务时才用)export class MyService extends Service { constructor(ctx: Context) { super(ctx, 'myService') }}2.2 可用级别的插件定义
极简插件只打印一句话,不算「能用」。一个真正可用的插件,通常是注册一个模型可调用的工具。这一步我们写一个 greet(打招呼)工具,并把它挂进真实的 dsh。
2.2.1 定义工具插件
文件 tmp/cordis-tutorial/greet-tool.ts:
import type { Context } from '@deepseek-ai/cordis'import { defineTool } from '@deepseek-ai/dsh-tools'import { CallId } from '@deepseek-ai/dsh-llm'export const name = 'greet-tool'export const inject = ['tools'] // 声明依赖:等 ctx.tools 就绪才挂载export function apply(ctx: Context) { ctx.tools.register(defineTool({ name: 'greet', // 工具名(模型看到的名字) description: 'Greet the named person.', // 工具说明(模型据此判断何时用它) parameters: { name: { type: 'string', required: true, description: 'Who to greet' }, // 参数 schema }, output: { schema: { type: 'string' }, // 返回值类型声明 render: (_args, value) => [{ type: 'text', text: value }], // 把返回值渲染成文本块 }, async execute(args) { // 真正执行的函数 return `Hello, ${args.name}!` }, })) // 主动走一次真实执行管线,代替模型发起调用(不接模型也能看到效果) void (async () => { const result = await ctx.tools.execute({ callId: CallId('demo-1'), // 关联 id(品牌类型,防止 id 串味) name: 'greet', arguments: { name: 'Cordis' }, signal: new AbortController().signal, }) console.log('tool replied:', JSON.stringify(result.content)) })()}逐段说明:
export const inject = ['tools']—— 声明「我需要tools服务」。框架会等到ctx.tools就绪才挂载这个插件。ctx.tools.register(defineTool({...}))—— 把工具注册进工具注册表。register返回的 disposer 会被框架自动挂到插件上,插件卸载时工具自动注销(可逆 effect)。defineTool的字段分工:name+description+parameters→ 拼成给模型看的 JSON Schema,模型据此决定是否调用、如何填参;output.schema→ 声明返回值类型;output.render→ 把execute返回值渲染成 UI/日志里的文本块。schema管类型侧,render管显示侧;execute(args)→ 真正执行,args类型由defineTool自动推断并在调用前校验。
- 末尾
void (async () => {...})()—— 主动调用一次ctx.tools.execute,模拟模型发起的调用,这样不接模型、无需 key 也能看到效果。
观察者插件tool-logger.ts(订阅 tools/result 事件,验证事件通信):
import type { Context } from '@deepseek-ai/cordis'import type {} from '@deepseek-ai/dsh-tools' // 引入声明合并,让事件名有类型提示export const name = 'tool-logger'export const inject = ['tools']export function apply(ctx: Context) { ctx.on('tools/result', (exec, result) => { const text = result.content .map(block => (block.type === 'text' ? block.text : '')) .join('') console.log(`[tool-logger] ${exec.name} -> ${text}`) })}import type {} 什么都不导入,只为引入该包的类型声明,让 'tools/result' 事件名及其参数有类型提示。ctx.on('tools/result', ...) 订阅事件——它和 greet-tool互不知道对方存在,靠事件名连接。
组合并运行(dsh-tools 依赖 system-prompt 服务,一起列上):
- name: '@deepseek-ai/dsh-system-prompt'- name: '@deepseek-ai/dsh-tools'- name: './tool-logger.ts'- name: './greet-tool.ts'
node --import tsx ../../vendor/cordis/bin.js
输出:
[tool-logger] greet -> Hello, Cordis!tool replied: [{"type":"text","text":"Hello, Cordis!"}]注意 [tool-logger] 先打印——tools/result 在「结果物化」阶段就派发,早于 execute 的 promise 返回。
2.2.2 挂进真实的 dsh(patch / bundle / profile)
上面的插件跑在教程的沙盒启动器里。要挂进真实的 dsh,需要理解三层配置:
- profile(配置档案):命名组合(如
web、headless),列出它叠了哪些 bundle 和用户自己的 patch。 - bundle(捆绑包):一组配置行 + 挂载的代码,可分发。
- patch(补丁层):按
id定位某行替换其 config,或insert插入新行。
分层顺序(越靠后越能覆盖):空列表 → 每个 bundle → profile patch → 家目录 patch → --patch 命令行 overlay。
看真实机器会启动什么:
node --import tsx/esm apps/cli/src/bin.ts --profile web --dump-config
输出里每行是一个插件,注释 # == @deepseek-ai/dsh-base 标出来源层。
写插件 + patch。插件 my-plugin.ts(与上面几乎一样,多一行打印方便观察执行):
import type { Context } from '@deepseek-ai/cordis'import { defineTool } from '@deepseek-ai/dsh-tools'import { CallId } from '@deepseek-ai/dsh-llm'export const name = 'my-plugin'export const inject = ['tools']export function apply(ctx: Context) { console.log('[my-plugin] apply() running — registering `hello` tool on ctx.tools') ctx.tools.register(defineTool({ name: 'hello', description: 'Say hello to the named person.', parameters: { name: { type: 'string', required: true, description: 'Who to greet' }, }, output: { schema: { type: 'string' }, render: (_args, value) => [{ type: 'text', text: value }], }, async execute(args) { return `Hello, ${args.name}!` }, })) // 自测:主动调用一次,验证工具真的注册成功且能被调用(无需模型和 API key) void (async () => { const result = await ctx.tools.execute({ callId: CallId('test-hello'), name: 'hello', arguments: { name: 'Test' }, signal: new AbortController().signal, }) console.log('[my-plugin] self-test: hello tool executed ->', JSON.stringify(result.content)) })()}patch 文件 my-patch.yml(用 file URL 指向本地插件文件):
- insert: - id: my-plugin name: 'file:///d:/common_file/SJU/Obsidian_vault/09_project/reading/deepseek-harness/tmp/cordis-tutorial/my-plugin.ts'
用 file URL 而不是相对路径,是因为真实 dsh 里 Loader 的
baseUrl锚定在 profile 目录,相对路径容易踩坑,file URL 最稳。
验证一:静态组合(只组合不 boot):
node --import tsx/esm apps/cli/src/bin.ts --profile web --dump-config --patch ./tmp/cordis-tutorial/my-patch.yml
输出(grep my-plugin):
# == D:...tmpcordis-tutorialmy-patch.yml- id: my-plugin name: >- file:///d:/.../tmp/cordis-tutorial/my-plugin.ts
验证二:真正 boot(看 apply 执行):
node --import tsx/esm apps/cli/src/bin.ts --profile web --patch ./tmp/cordis-tutorial/my-patch.yml
这条命令必须在仓库根目录运行,因为它要通过
apps/cli/src/bin.ts加载整个 web profile。--patch参数用相对路径./tmp/cordis-tutorial/my-patch.yml是相对于当前目录(仓库根目录)的。
日志:
[my-plugin] apply() running — registering `hello` tool on ctx.tools[my-plugin] self-test: hello tool executed -> [{"type":"text","text":"Hello, Test!"}]dsh web: http://127.0.0.1:3080三行证明:
- 插件被加载、
apply执行、工具注册成功; - 自测代码主动调用
hello工具并得到正确结果Hello, Test!——工具真的能用,无需模型和 API key; - Web 服务器正常启动。
如何停止 web 服务:按 Ctrl+C 退出。如果 Ctrl+C 之后端口 3080 仍然被占用(残留 node 子进程没杀干净),用以下命令清理:
Get-NetTCPConnection -LocalPort 3080 -State Listen | Select OwningProcessStop-Process -Id -Force
2.2.3 概念辨析:Skill / Tool / Plugin(一个容易踩的坑)
挂好插件后,很自然想「去 Web UI 里看看我的插件在不在」,结果往往找不到。原因是 dsh 里有三个名字相似、但层次完全不同的概念,很容易混:
| 概念 | 英文 | 是什么 | 你的案例对应 |
|---|---|---|---|
| 技能 | Skill | .agents/skills/*.md,给 AI agent 用的「知识/工作流」文件(如 dsh-code-review) | 无 |
| 工具 | Tool | ctx.tools.register 注册的模型可调用函数 | hello |
| 插件 | Plugin | 带 apply(ctx) 的 Cordis 模块,挂到 Loader 树 | my-plugin |
你注册的 my-plugin 是插件(Plugin),它顺带贡献了一个工具(Tool)hello。但当你问「有哪些插件」时,得到的答案常常是 Skill 列表——因为 .agents/skills/ 下的技能文件也会被称作「技能/插件」,AI 助手或界面很容易把「插件」理解成「Skill」。
为什么你的插件查不到:
- 它不是 Skill——不在
.agents/skills/目录下; - 它不在 preset 的 cordis.yml 静态清单里——因为你是用
--patch命令行 overlay 动态挂进去的,不是静态写进 profile/bundle; - 它只活在当前这次 boot 的 Loader 树里。
正确查你的插件,只有这三处:
--dump-config(配置树,含 --patch 层):能看到 - id: my-plugin;
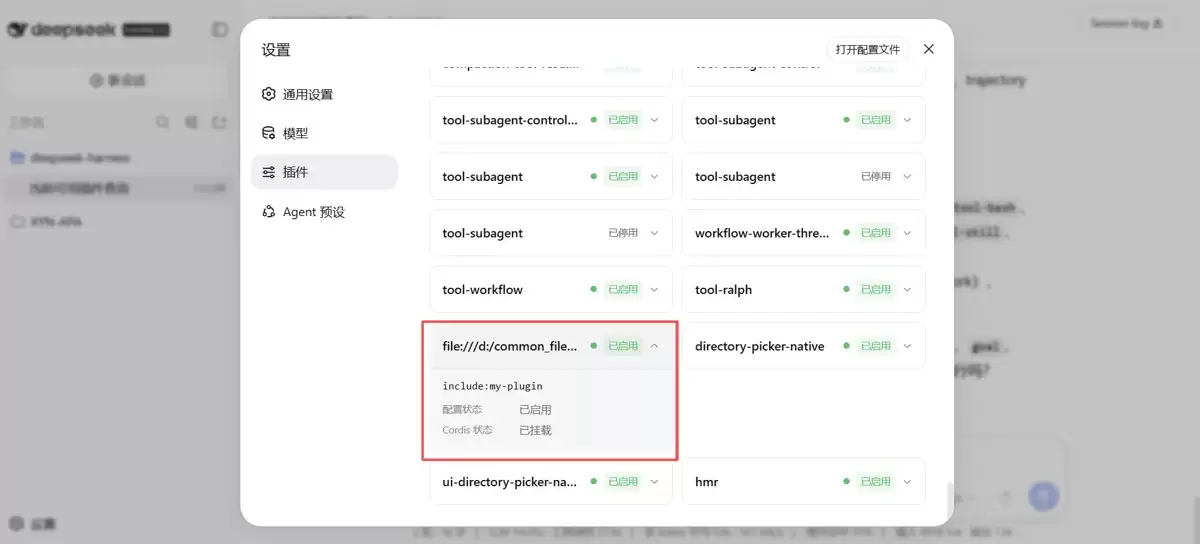
Web UI 的 Settings → Plugins(读 ctx.loader.entries() 的只读清单):搜索 my-plugin 能定位到,标题显示为 file URL;
boot 日志(最直接的运行时证据):[my-plugin] apply() running + 自测输出。
一句话:你的插件一直在正常运行,只是「查插件」这个动作问错了对象(查成了 Skill 或静态清单)。
附录
踩坑记录
- 停
pnpm dsh web杀不干净 node 子进程,残留进程占 3080,下次 boot 报EADDRINUSE。清理:
Get-NetTCPConnection -LocalPort 3080 -State Listen | Select OwningProcessStop-Process -Id -Force
- boot 因端口冲突失败时,插件
apply依然先执行——因为「挂插件」和「起服务器」是两个阶段。 --dump-config只组合配置、不 boot。它只能验证「插件进了配置树」,验证不了「apply 真的执行」——后者要真正 boot 看日志。
速查表
| 你想做的事 | 机制 / 入口 |
|---|---|
| 加一个模型 provider | 在 ctx.llm 注册 adapter |
| 加一个模型可见能力 | 在 ctx.tools 注册;schema 自动进 prompt 组装 |
| 加 shell 执行 | 在 ctx.shell 注册 backend |
| 加文件访问 / 策略 | 注册 ctx.fs provider,或监听 fs/* 事件 |
| 拦截请求 / 工具 / turn | 用 agent/* 或 tools/* 事件(waterfall) |
| 加模型可见上下文 | 调 agent.inject() |
| 看真实启动的树 | dsh --profile web --dump-config |