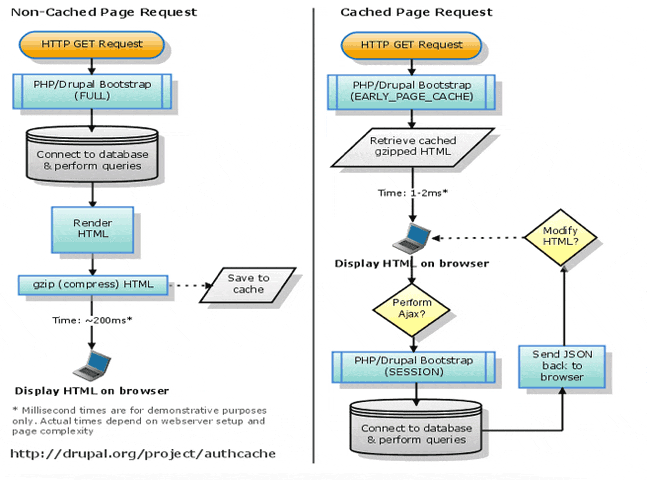
Drupal模块讲解-Authcache缓存原理详解教程
相关文章:Drupal的模块高级应用之Authcache-动态加载内容教程
Authcache模块和Boost模块的原理不一样,Boost模块是生成静态页面,所以缓存的效果最好,速度最快。Authcache模块是利用Drupal自身的缓存机制,生成页面缓存,由于进入到了Drupal环节,因此速度没有Boost缓存快,但是优点就是可以灵活的使用PHP/Drupal相关方法,动态处理数据。

首先,我们从Drupal的bootstrap讲起。
function drupal_bootstrap($phase = NULL, $new_phase = TRUE) {
// Not drupal_static(), because does not depend on any run-time information.
static $phases = array(
DRUPAL_BOOTSTRAP_CONFIGURATION,
DRUPAL_BOOTSTRAP_PAGE_CACHE,
DRUPAL_BOOTSTRAP_DATABASE,
DRUPAL_BOOTSTRAP_VARIABLES,
DRUPAL_BOOTSTRAP_SESSION,
DRUPAL_BOOTSTRAP_PAGE_HEADER,
DRUPAL_BOOTSTRAP_LANGUAGE,
DRUPAL_BOOTSTRAP_FULL,
);
….
}
这是Drupal自带的bootstrap的几个环节(Drupal7),从CONFIGURATION、一直到 FULL,这样整个Drupal就启动了,所有的模块也加载了。
其中我们发现,有一个环节叫 PAGE_CACHE,我们来把这个阶段的处理函数完整的贴出来,以便大家能更好的理解这段代码。
function _drupal_bootstrap_page_cache() {
global $user;
// Allow specifying special cache handlers in settings.php, like
// using memcached or files for storing cache information.
require_once DRUPAL_ROOT . '/includes/cache.inc';
foreach (variable_get('cache_backends', array()) as $include) {
require_once DRUPAL_ROOT . '/' . $include;
}
// Check for a cache mode force from settings.php.
if (variable_get('page_cache_without_database')) {
$cache_enabled = TRUE;
}
else {
drupal_bootstrap(DRUPAL_BOOTSTRAP_VARIABLES, FALSE);
$cache_enabled = variable_get('cache');
}
drupal_block_denied(ip_address());
// If there is no session cookie and cache is enabled (or forced), try
// to serve a cached page.
if (!isset($_COOKIE[session_name()]) && $cache_enabled) {
// Make sure there is a user object because its timestamp will be
// checked, hook_boot might check for anonymous user etc.
$user = drupal_anonymous_user();
// Get the page from the cache.
$cache = drupal_page_get_cache();
// If there is a cached page, display it.
if (is_object($cache)) {
header('X-Drupal-Cache: HIT');
// Restore the metadata cached with the page.
$_GET['q'] = $cache->data['path'];
drupal_set_title($cache->data['title'], PASS_THROUGH);
date_default_timezone_set(drupal_get_user_timezone());
// If the skipping of the bootstrap hooks is not enforced, call
// hook_boot.
if (variable_get('page_cache_invoke_hooks', TRUE)) {
bootstrap_invoke_all('boot');
}
drupal_serve_page_from_cache($cache);
// If the skipping of the bootstrap hooks is not enforced, call
// hook_exit.
if (variable_get('page_cache_invoke_hooks', TRUE)) {
bootstrap_invoke_all('exit');
}
// We are done.
exit;
}
else {
header('X-Drupal-Cache: MISS');
}
}
}
当我们看到最下面,exit ;(We are done)之处,我们就知道,Drupal已经处理完了请求,后面的环境(Session、数据库、模块、FULL)等环节就不用启动了,因此大大节省了服务器的处理时间和提高了响应时间。
这就是Drupal自带的缓存处理机制!!
Drupal自带的缓存机制缺点也很明显,就是只对匿名用户有效。
因此,Authcache模块就出现了,Authcache就是利用Drupal自带的缓存机制,实现对登录用户的缓存。
继续看上面的代码,其中有3行,如下:
foreach (variable_get('cache_backends', array()) as $include) {
require_once DRUPAL_ROOT . '/' . $include;
}
其中,获取’cache_backends’的时候,加载了一个数组变量,所以在Drupal自身的缓存阶段要使用到authcache,那就必须修改这个 cache_backends。
果如其然,如下所示,我们在安装authcache的时候,就必须设置如下变量。
$conf['cache_backends'][] = 'sites/all/modules/authcache/authcache.cache.inc';
$conf['cache_backends'][] = 'sites/all/modules/authcache/modules/authcache_builtin/authcache_builtin.cache.inc';
这个时候,我们就加载进了authcache.cache.inc和文件了。
继续…
我们打开authcache.cache.inc 其中,就是定义一些函数。
继续查看authcache_builtin.cache.inc文件,看到如下代码:
$delivered = authcache_builtin_cacheinc_retrieve_cache_page();
if ($delivered) {
exit;
}
也就是说在这个时候,如果命中了缓存就直接输入页面内容,不再继续boot!这个地方也就代替了原本Drupal自己查找缓存和计算命中缓存的逻辑,使用authcache自己的算法,根据用户的角色不同,使用的缓存不同。
这就是authcache的核心!
当然authcache还可以做更多,比如,
1. 根据用户不同,生产不同的缓存(需要处理)。
2. 配合authcache_p13n模块,动态处理某些局部页面,比如某个block。
3. 修改缓存的某个些内容。(稍后会详细讲解)
等等,这就是authcache比boost灵活的地方,当然也是缺点,需要调用很多PHP、数据库等等,肯定比boost慢一些。


